All posts by Admin

QuickBooks Database Server Manager Stopped: Causes & Fixes

Did you encounter errors like “QuickBooks Database Server Manager stopped working,” “QBDBMgrN not running on this computer,” or “QuickBooks Database Server Manager not responding,” while hosting?

This issue usually means the QuickBooks database service has stopped or failed to start correctly. It commonly affects multi-user mode and prevents workstations from accessing the company file stored on the server.

Some users may also encounter the QuickBooks Database Server Manager Network Diagnostics Failed error while accessing company files over the network. In this guide, we’ll explain the causes behind these errors and provide step-by-step solutions to restart QuickBooks Database Server Manager, repair QBDBMgrN issues, and restore multi-user access.

What is QuickBooks Database Server Manager?

The QuickBooks Database Server Manager is a utility that lets multiple users access the same company file over a network. Without this tool, you won’t be able to run the multi-user mode properly and may come across the following errors;

  • QBDBMgrN not running
  • QuickBooks Database Server Manager is not working
  • QuickBooks Database Server Manager won’t start

Common Causes Of QuickBooks Database Server Manager Not Starting

To fix the issue smoothly, it’s essential to first understand what causes the QuickBooks Database Server Manager not starting issue.

  • Corrupt or incomplete installation of QuickBooks Database Server Manager.
  • Using the outdated version of QuickBooks Desktop.
  • Firewall is blocking QuickBooks Database Server Manager processes.
  • Inadequate admin rights to start the QuickBooks Database Server Manager service.
  • Damaged company file folder or incorrect hosting settings.
  • The QuickBooksDBXX service is either disabled or not running as a Windows service.
  • Missing or damaged system files required for QBDBMgrN to run.

Here’s How to Resolve the QBDBMgrN Not Running on This Computer Issue

Now, let’s go through the proven solutions to fix the QBDBMgrN on this computer issue and restore multi-user mode functionality.

Method 1: Turn On Hosting

  • Make sure that you have enabled the hosting on all of your server computers.
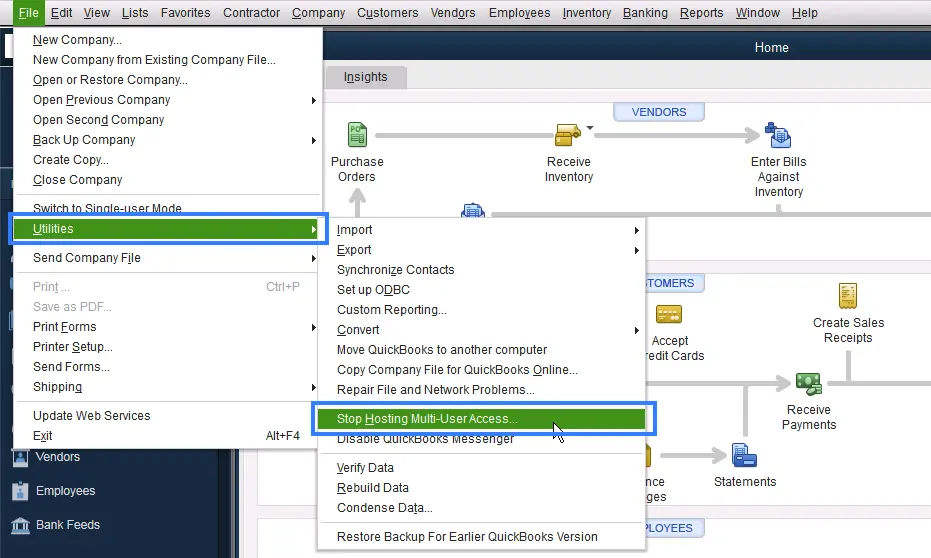
QBDBMgrN Not Running on This Computer Issue
  • Go to the File menu, click Utilities and then select Host multi-user access option.
  • When you are on the Host multi-user access window, click Yes.

Method 2: Configure Services

Also, you must verify that the services required to run QBDBMGrN are configured properly.

  • Open the Run window using the Windows + R keys.
  • Now, type “services.msc” in the text field and click OK.
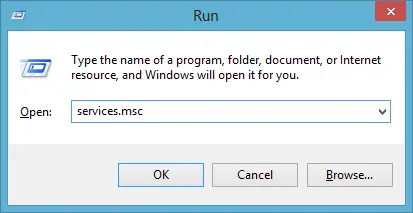
services.msc
  • Search for services.msc in the Windows search bar.
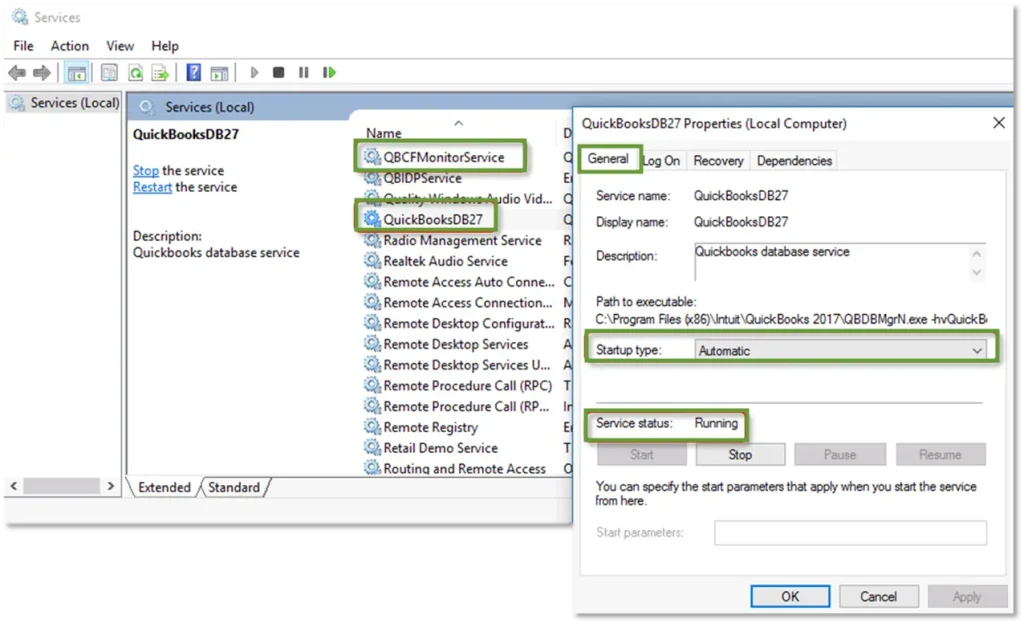
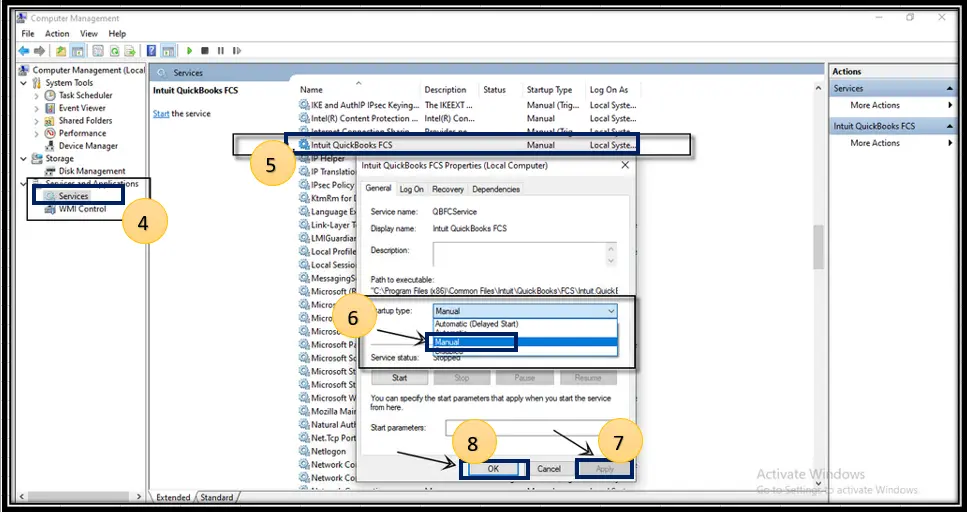
  • In the services window, locate the QuickBooksDBXX service that matches along with your version.
    • QuickBooks 2020: QuickBooksDB30
    • QuickBooks 2019: QuickBooksDB29
    • QuickBooks 2018: QuickBooksDB28
  • Double-click on the QuickBooksDBXX service.
  • Now, configure these settings:
    • Startup Type: Automatic
    • Service Status: Running or Started
Review the Services Running On your Server
  • Move to the Recovery tab.
  • ChooseRestart the Service from the First Failure drop-down menu. It will automatically restart the QuickBooks DB service if it’s stopped. You need to perform the same for Second Failure and Subsequent Failures.
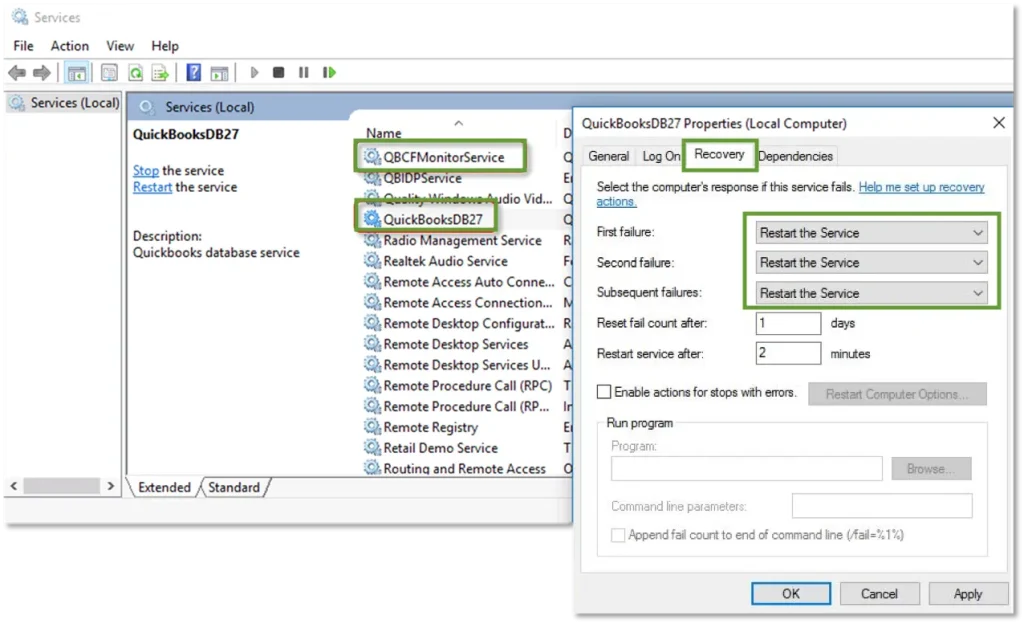
Recovery tab and click Restart the Service
  • Click OK to apply the changes and then restart your computer.

Method 3: Recreate QBDataServiceUserXX

Note: If you are getting an error stating that your Windows user account doesn’t have sufficient permissions, then log in as a Windows administrator. Otherwise, you may ask for help from an IT expert.

  • Exit from the QuickBooks program.
  • Press Windows + R to bring up the Run window.
  • Now, type “services.msc” and click OK.
  • Right-click on the service that matches your version and click Properties.
    • QuickBooks 2020: QuickBooksDB30
    • QuickBooks 2019: QuickBooksDB29
    • QuickBooks 2018: QuickBooksDB28
  • Move to the Logon tab and set the services to This Account.
    • Important Tip: Avoid choosing Local System. There are only a few setups that let you work on the Local System.
  • Remove the QBDataServiceUserXX account.
    • Launch the Run window and type Control Panel.
    • Choose the User Accounts and click Remove User Account.
    • Opt for the qbdataserviceuserXX that matches your version and hit Delete.
  • Open QuickBooks again.
    • Important Note: If you have enabled the hosting, disable it and then turn it back on again. If hosting isn’t started, then turn it on.
  • If you get a notification to run QuickBooks Database Server Manager, click OK.
  • Finally, launch the Database Server Manager and scan the file. It will recreate the QBDataServiceUser.

Method 4: Restart the QuickBooks Database Service Manager

If your QuickBooks Database Server Manager not working, it’s recommended to restart the service on your server computer (the one that hosts the company file). To restart, perform the steps outlined below for your current setup.

Case 1: If you installed QuickBooks Desktop & Database Server Manager

  • Launch QuickBooks Desktop on your server computer and click the File menu.
  • Choose the Open or Restore Company.
  • Go to the Open a company file option. Locate and open your QuickBooks company file.
  • Circle the Open file in multi-user mode checkbox and choose Open.
  • Now, log in to your company file and go to the File menu again.
  • Hit the Close Company/Log Off option, and it will close your data file on the server.
  • Launch the Start menu and add Database in the search box. Then, launch the QuickBooks Database Server Manager.

If everything is working well, then you can proceed further. However, if your QuickBooks database server manager keeps stopping, perform the steps in the “If you only installed Database Server Manager section.”

Case 2: If you only installed Database Server Manager

  • Click the Start menu and open the Control Panel.
  • After this, launch Administrative Tools and choose Services from the list.
  • Right-click the QuickBooksDBXX service and hit Restart.
    • Note: XX represents the year of Database Server Manager.

If you still fail to restart the Database Server Manager, then restart your server computer. Then, perform these steps again.

Method 5: Reinstall QuickBooks Database Server Manager

If you get the QuickBooks database server manager stopped working issue while trying to update or install QBDBMgrN, apply the following steps to fix the issue.

A. Uninstall the Database Server Manager

  • Open the Run window and type appwiz.cpl in the search box.
  • Click OK and choose the QuickBooks Database Server Manager.
  • Now, click the Uninstall/Change option.

B. Rename the Installation Folder

Perform the following steps to rename the installation folder.

  • Move to your installation folder location.
  • Open the Run window by pressing Windows + R.
  • After this, copy and paste the location of the folder.
  • Now, right-click the folder and select Rename. Then, rename the folder by adding .OLD at the end of the folder name.

C. Reinstall QuickBooks Database Server Manager

Once completed, reinstall the QuickBooks Database Server Manager.

  • Exit all the open programs on your server computer, including QuickBooks.
  • Launch the installed file “Setup_QuickBooks.exe”. Then, perform the instructions given on the screen.
  • Choose Custom or Network Options when asked to select an install type and click Next.
  • Pick the suitable option for network setup and click Next. Using both these options, you can install the Database Server Manager. If you notice that QuickBooks is previously installed on your server computer, it won’t overwrite any existing company data.
    • Choose “I’ll be using QuickBooks Desktop on this computer, AND I’ll be storing…..” option to run both QuickBooks Database Server Manager and QuickBooks Desktop on your server computer.
    • To run only Database Server Manager on your server computer, pick “I will NOT be using QuickBooks Desktop…” option.
  • Finally, hit the Install option.

Method 6: Update Your Firewall

An outdated Windows Firewall configuration can block QuickBooks hosting services, which can cause the QBDBMgrN Not Running on This Computer error.

  • Open the Run window and type Control Firewall.cpl in the text box.
  • Hit the Enter key and open Windows Firewall.
  • Choose the Update Your Firewall option.
  • Now, tap on Update Now and Use Recommended Settings. Then, see if any latest updates are available.
  • Relaunch your PC.

If you find that the error still persists, restart QuickBooks Database Server Manager.

Method 7: Set Windows Access Permissions to Share Company Files

Proper administrator access is required to run QuickBooksDBXX and QBCFMonitorService smoothly on your server computer. Use the steps given below to set Windows access permissions to share data files.

A. Check that the permissions are set correctly

  • Open the Start menu and then open File Explorer.
  • Now, right-click on the folder and choose Properties.
  • Go to the Security tab and click Advanced.
  • Choose QBDataServiceUserXX and select Edit.
  • Make sure that the following settings are set to Allowed:
    • Traverse Folder/Execute File
    • List Folder/Read Data
    • Read Attributes
    • Read Extended Attributes
    • Create Files/Write Data
    • Create Folders/Append Data
    • Write Attributes
    • Write Extended Attributes
    • Read Permissions

If permissions aren’t set properly;

  • Right-click on the QuickBooks company file folder and click Properties.
  • Go to Security and choose the Edit menu.
  • Pick the QBDataServiceUserXX and tap on Full Control > Allow.
  • Now, hit Apply and OK.

B. Change Folder Permissions

To adjust folder permissions,

  • Click on the Start menu and launch File Explorer.
  • Locate and right-click on the following folders.
    • C:\Program Data\Intuit\Entitlement Client\v8
    • C:\Program Data\Intuit\Entitlement Client\v6.0
    • C:\Program Data\Intuit\Entitlement Client\v5
    • C:\Program Data\Intuit\Entitlement Client\v3
    • C:\Program Data\Intuit\Entitlement Client
    • C:\Program Data\Intuit\QuickBooks Enterprise Solutions X.0 (X = version) or C:\Program Data\Intuit\QuickBooks 20XX (XX = year)
    • C:\Program Data\COMMON FILES\INTUIT
    • C:\Program Data\COMMON FILES\INTUIT\QUICKBOOKS
    • C:\Users\Public\Public Documents\Intuit\QuickBooks\FAMXX (XX = year)
    • C:\Users\Public\Public Documents\Intuit\QuickBooks\Company Files
    • C:\Users\Public\Public Documents\Intuit\QuickBooks\Sample Company Files\QuickBooks Enterprise Solutions X.0 (X = version) or C:\Users\Public\Public Documents\Intuit\QuickBooks\Sample Company Files\QuickBooks 20XX (XX = year)

Implement these steps for any folder listed below. Make sure you do not have all of these folders. A few of them are restricted to certain QuickBooks Desktop versions.

  • Right-click on the QuickBooks folder and click Properties.
  • Move to the Security tab and choose Everyone.
    • Important Tip: If Everyone isn’t mentioned in the Group or User Name checkbox, click Add and type Everyone. Then, hit OK.
  • Choose the Full Control, Apply and then OK option.

Set Windows Access Permissions to share company files

Ensure that QuickBooks has enough permissions to help avoid future issues while working with your data files over the network.

Windows 10

  • Open the Start menu and launch File Explorer.
  • Right-click on the company file folder and click Properties.
  • Choose Sharing and then hit the Share Add option.
  • Now, pick the corresponding QBDataServiceUserXX for your version.
  • Make sure that the permission levels of both users are set to Full Control and click the Share option.

Method 8: Configure Your Windows Firewall Settings

At times, Windows Firewall blocks QuickBooks services from communicating over the network, which may cause issues such as QBDBMgrN not running, QuickBooks Database Server Manager stopped working, or multi-user mode errors. To resolve this issue, allow QuickBooks through the firewall and open the required ports.

Add Firewall Port Exception

If you are using multiple versions of QuickBooks on the same computer, use the following steps for each version.

  • Click the Start menu and type “Windows Firewall” into the text field.
  • Open the Windows Firewall and choose Advanced Settings.
  • Now, right-click on Inbound Rules and hit New Rule.
  • Pick the Port and then the Next option.
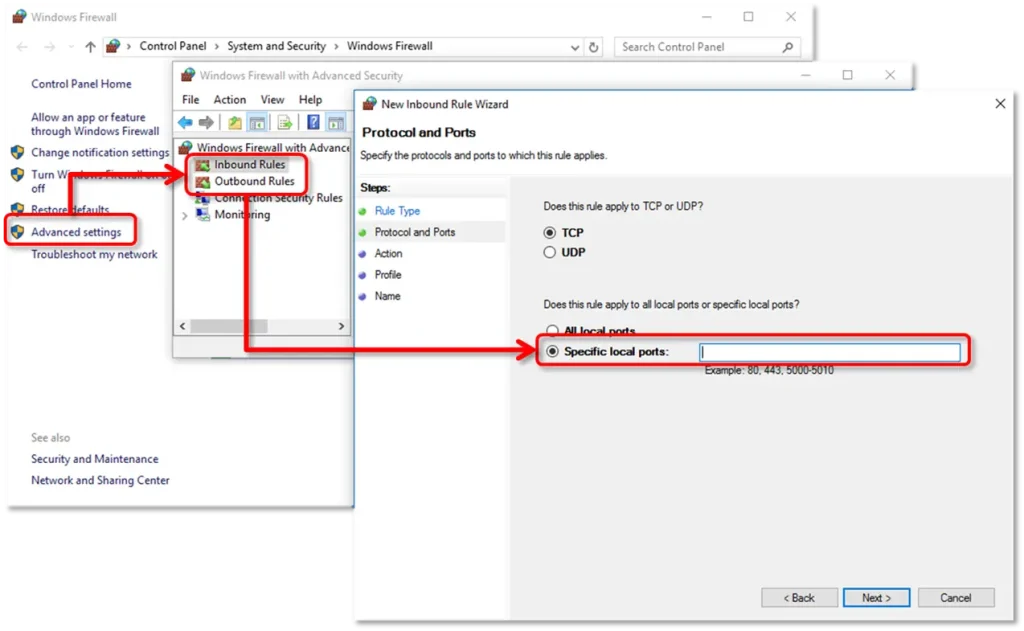
Add Firewall Port Exception
  • Ensure that TCP is selected.
  • After that, mention the specific ports required for your QuickBooks year version:
    • QuickBooks Desktop 2020 and later: 8019, XXXXX.
    • QuickBooks Desktop 2019: 8019, XXXXX.
    • QuickBooks Desktop 2018: 8019, 56728, 55378-55382.
    • QuickBooks Desktop 2017: 8019, 56727, 55373-55377.
Note: The QuickBooks Desktop 2019, 2020, and future versions access dynamic ports. These are some specific firewall ports which are assigned during installation which ensure QB Desktop gets exclusive use of a given port.
  • To get the dynamic port number, launch the Start menu and type QuickBooks Database Server Manager. This will open the QBDBMgrN and move to the Port Monitor tab. Look for your QuickBooks version. Note down the Port Number. You can use it for your firewall port exceptions.
Important Tip: You can edit the assigned port number by clicking Renew. If you change it, move to Scan Folders tab and click Scan Now to update the firewall permissions. Remember that you can only renew ports for Desktop 2019 and later versions. The ports can’t be renewed for the older versions.
  • After providing the Port number, click Next.
  • Choose Allow the Connection and hit Next.
  • When asked, make sure all profiles are marked and click Next.
  • Now, create a rule and name it as “QBPorts(year).”
  • Once all the changes are done, click Finish.

Use the same steps again to create outbound rules. Repeat all the same steps, except Outbound Rules on Step 4.

Launch QuickBooks Desktop and switch to multi-user mode. You can also launch QuickBooks over the network from one of the host computers.

Create Windows Firewall Exceptions for QuickBooks programs

QuickBooks accesses executable files (.exe) to run various tasks.

Use the following steps to create exceptions for each executable on the table:

  • Open the Start menu, type Windows Firewall and open Windows Firewall.
  • Choose the Advanced Settings and right-click Inbound Rules. Then, click the New Rule option.
  • Select the Program and then the Next option.
  • Now, tap on This Program Path and click Browse.
  • Locate and choose one of the executable files from the table below and hit Next.
  • After that, click Allow the Connection and then hit Next.
  • At last, generate a new rule and give it a new name, QBFirewallException(name.exe).”

Resume the same steps given above and create outbound rules. Follow all the same steps, except click Outbound Rules on Step 4.

AutoBackupExe.exeC:\Program Files\Intuit\QUICKBOOKS YEAR
Dbmlsync.exeC:\Program Files\Intuit\QUICKBOOKS YEAR
DBManagerExe.exeC:\Program Files\Intuit\QUICKBOOKS YEAR
FileManagement.exeC:\Program Files\Intuit\QUICKBOOKS YEAR
FileMovementExe.exeC:\Program Files\Intuit\QUICKBOOKS YEAR
QuickBooksMessaging.exeC:\Program Files\Intuit\QUICKBOOKS YEAR
QBW32.exeC:\Program Files\Intuit\QUICKBOOKS YEAR
QBDBMgrN.exeC:\Program Files\Intuit\QUICKBOOKS YEAR
QBServerUtilityMgr.exeC:\Program Files\Common Files\Intuit\QuickBooks
QBCFMonitorService.exeC:\Program Files\Common Files\Intuit\QuickBooks
QBLaunch.exeC:\Program Files\Common Files\Intuit\QuickBooks
QBUpdate.exeC:\Program Files\Common Files\Intuit\QuickBooks\QBUpdate
IntuitSyncManager.exeC:\Program Files\Common Files\Intuit\Sync
OnlineBackup.exeC:\Program Files\QuickBooks Online Backup

How You Can Avoid QuickBooks Database Server Manager Won’t Start?

Consider the following pointers;

  • Keep your QuickBooks software up-to-date.
  • Check that your network connection is stable.
  • Make sure to scan your company file folders regularly.
  • Always ensure proper installation of Intuit QuickBooks Database Server Manager.
  • Avoid sudden system shutdowns.

Final Thoughts

The QuickBooks Database Server Manager stopped working error can disrupt multi-user access and network connectivity. But, it can be fixed by using the correct troubleshooting methods like restarting the service, checking the Windows firewall, turning on hosting settings, configuring services or setting Windows access permissions. However, maintaining proper network configuration and keeping your software updated can help prevent these errors in the future.

Frequently Asked Questions

Why is QBDBMgRN not running on this computer?

The “QuickBooks Database Server Manager not running on this computer” issue may occur due to Windows blocking the connection, a corrupt network data (.ND) file, stopped background services or improper installation.

Where is the QuickBooks database server manager?

To get the QuickBooks Database Server Manager, open the Start menu and type Database in the text field. Then, open QBDBMgrN.

What does the QuickBooks Database Server manager do?

The QuickBooks Database Server Manager enables multiple users to use company files stored on a server. It creates and then manages network data files that allow smooth communication between servers and workstations.
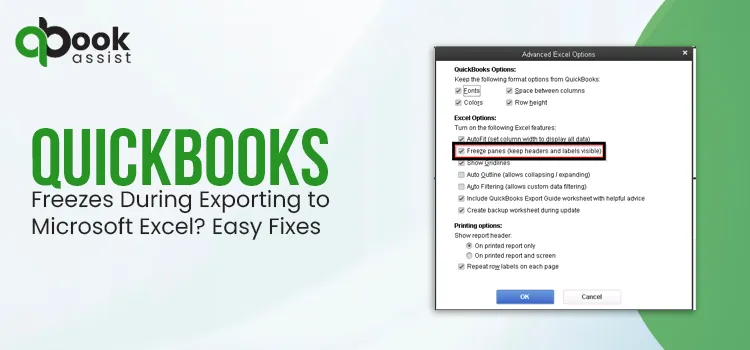
QuickBooks Freezes During Exporting to Microsoft Excel? Easy Fixes

When using QuickBooks Desktop, exporting financial reports to Microsoft Excel is important for accounting and data analysis.

However, many users face issues such as QuickBooks freezes during exporting to Microsoft Excel, QuickBooks won’t export to Excel, or QuickBooks crashes when exporting to Excel. This problem mainly occurs due to software incompatibility, corrupted Microsoft Office components, or system permission conflicts. Unfortunately, this issue may crash your QuickBooks program or stop during the export process. So, it’s important to fix the issue and regain the export.

QuickBooks Freezes During Exporting to Microsoft Excel

In this article, we have explained the causes, symptoms, and step-by-step solutions to fix QuickBooks export to Excel errors on Windows and Mac.

What are the Symptoms of the QuickBooks Export to Excel Error?

Common signs of QuickBooks Export to Excel issues include:

  • QuickBooks freezes after clicking Export to Excel.
  • The exported file opens without report data.
  • QuickBooks crashes during the export process.
  • The export button is grayed out or unavailable.
  • Excel does not launch after QuickBooks tries to export the reports.
  • Error messages such as;
    • QuickBooks won’t export to Excel
    • Unable to export to Excel from QuickBooks
    • QuickBooks export to Excel error

Reasons Why QuickBooks Unable to Export to Excel

QuickBooks may fail to export reports due to;

  • Damaged Microsoft Office or QuickBooks installations.
  • Incompatible versions of QuickBooks and Excel.
  • Corrupted report or company file data.
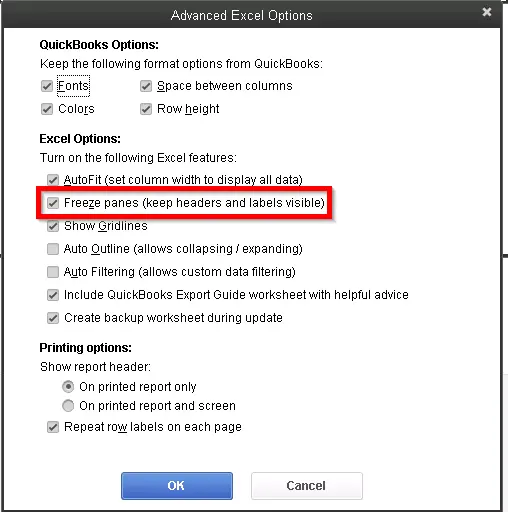
  • Incorrect Excel export settings.
  • Restricted Windows User Account Control (UAC) settings.
  • Unsupported Microsoft Office version.
  • System conflicts or missing permissions.

Troubleshooting Steps to Fix QuickBooks Desktop Freezes When Exporting to Excel

Here’s what to do when QuickBooks Desktop freezes when exporting to Excel. This will help you get back to your business without making any further delays.

Method 1: Make sure the QuickBooks version is up to date

Firstly, users must ensure that they are using the updated QuickBooks Desktop version. Keeping your application updated will ensure that QuickBooks runs smoothly without any issues. Right after the update, open QuickBooks and try to export a report by performing the following steps.

  • Launch the QuickBooks program and click the Reports menu.
  • Open any report from the list and hit the Excel button.
  • With this, you will get all the export options, including Excel, on your screen.

Method 2: Verify the QuickBooks System Specifications

Being a QuickBooks user, you must know that QuickBooks Desktop works with specific versions of MS Office. So, look for the system specifications according to your QuickBooks version.

Method 3: Fix Export Issues By Repairing Microsoft Office

If Microsoft Excel does not work properly, then it might lead to the QuickBooks export to Excel not working issue. So, restarting it may resolve the issue. But, if the issue still continues, repair your MS Office with these steps.

a. Windows 11

  • Press the Windows Logo key and choose Apps and Features.
  • Choose the Microsoft 365 or Office Product you wish to repair. Then, hit the Modify option.
  • Now, you will get the following options for repairing according to your Microsoft 365 or Office installation type.
    • Click-to-run: From the “How would you like to repair your Office programs, click Online Repair and then the Repair option.
    • MSI-based: From the Change your installation, hit the Repair and then Continue option.
  • Complete the repair process by performing the on-screen steps.

b. Windows 11

  • Go to the Start button, right-click on it, and choose Installed Apps.
  • Pick the Microsoft 365 or Office product that you want to repair. Hit the Ellipses and then the Modify option.
  • According to your Microsoft 365 or Office installation type, select any of the following options to complete the repair.
    • Click to Run: From “How would you like to repair your Microsoft 365 and Office programs, click Online Repair and then Repair.
    • MSI-based: From the Change your installation window, click Repair and then Continue.
  • Complete the steps by performing the remaining steps as instructed on the screen.

Method 4: Adjust Windows User Account Control Settings

QuickBooks freezes when exporting to Excel due to a lack of Windows User account control restrictions. Adjusting the UAC settings will give QuickBooks some necessary permissions to run smoothly and export reports without any hassle.

  • Move to the Start menu and write “User Account Control Settings” in the search box.
  • Now, launch the User Account Control Settings option.
  • After this, move the slider towards the Never Notify option.
  • Click OK and then start your computer once again.

Read More:- QuickBooks Desktop Mac Plus 2024

Method 5: Verify that Microsoft Excel’s default file format is .xls

Go to Microsoft’s official website and check which file format is compatible with MS Excel. Here, we have listed all the file formats that are supported by Excel.

  • Excel Workbook
  • Excel Macro-Enabled Workbook (code)
  • Excel Binary Workbook
  • Template
  • Template (code)
  • Excel 97- Excel 2003 Workbook
  • Excel 97- Excel 2003 Template
  • Microsoft Excel 5.0/95 Workbook
  • XML Spreadsheet 2003
  • XML Data
  • Excel Add-In
  • Excel 97-2003 Add-In
  • Excel 4.0 Workbook
  • Works 6.0-9.0 spreadsheet

Method 6: Uninstalling & Reinstalling Excel

Follow the steps to uninstall and reinstall Microsoft Office to resolve the QuickBooks Desktop Excel export issue.

A. Uninstall MS Office

Perform the steps given below to uninstall Microsoft Office according to the installation type you have.

Windows 10

  • Move to the Start menu and head to the Control Panel.
  • Click Program > Programs and Features.
  • When you see Microsoft Office, right-click on it and hit Uninstall.

Windows 8.1, 8

  • Right-click on the Start menu and choose Control Panel.
  • Go to the Programs and Features option.
  • Now, right-click the Office product and tap on Uninstall.

B. Reinstall MS Office

  • Log in to the official Microsoft Office website and click the Install Apps option.
  • Select Install (or Install Apps) based on your Office version to start downloading Microsoft 365.
  • Depending on your browser, choose one of the following:
    • Run (Edge or Internet Explorer)
    • Setup (Chrome)
    • Save File (Firefox)
  • When prompted by User Account Control (UAC) to allow changes to your device, click Yes to start the installation.
  • Wait until you see the message “You’re all set! Office is installed now”, confirming the installation is complete.
  • A quick animation will show where to find your Office apps. Click Close to finish the process.

Method 7: Use the Correct Method to Export to Excel from QuickBooks

Sometimes, users may face a QuickBooks crash during export issues while exporting reports, forms, or files from QuickBooks incorrectly. So, to fix the issue, it’s essential to use the correct procedure to export Excel files from QuickBooks. Here are the complete steps.

  • Open the Customer Center and click Transactions from the Transaction Pane.
  • After this, head to the Transaction Journal from the Transaction list and pick a transaction.
  • Click on the Excel button, generate a new worksheet, and then export it to Excel.
  • Now, check that you have first opened the item list and then your report.
  • Move to the List option and then access the item list from there.
  • Browse to the Report menu, and then launch the report that you wish to open.
  • Hit the Email option and select the Export to Excel option.
  • Complete the process by choosing Email or Email as an Excel option.

Method 8: Reinstall QuickBooks Desktop

Before installing QuickBooks Desktop, make sure that you have installed Microsoft Office and Excel. If you haven’t installed Microsoft Office, then uninstall and reinstall QuickBooks Desktop.

A. Uninstall QuickBooks Desktop

  • Click the Start button and type Control Panel in the search area.
  • This will launch the Control Panel window and head to Programs and Features.
  • Pick the QuickBooks Desktop version from the list of programs.
  • Now, choose the Uninstall/Change or Remove. Then, hit the Next option to finish the uninstallation part.

B. Rename Installation Folders

  • First, open the File Explorer by hitting the Windows + E keys.
  • After that, locate the QuickBooks folder that holds the company file. You will get the file in any one of the following locations;
    • C:\ProgramData\Intuit\QuickBooks (year)
    • C:\Users\(current user)\AppData\Local\Intuit\QuickBooks (year)
    • C:\Program Files\Intuit\QuickBooks (year)
    • 64-bit version C:\Program Files (x86)\Intuit\QuickBooks (year)
  • Now, right-click the QuickBooks folder and click Rename.
  • Rename the folder by adding .OLD at the end.

C. Reinstall QuickBooks

  • Initially, launch the QuickBooks setup file i.e, QuickBooks.exe.
  • After that, follow the same steps given on-screen and accept the software license agreement.
  • Now, add the Product and License Numbers and click Next.
  • Move to Express > Next and then the Install option.
  • After completing the process, hit the Reopen QuickBooks option.
  • When done, return to QuickBooks and try to export a report.

QuickBooks Freezes During Exporting to Microsoft Excel on Mac

Users often experience QuickBooks freezes during Exporting to Excel on Mac due to an older Mac version, Mac security restrictions, or a corrupt Office installation. Therefore, to fix the issue, perform the following solutions.

Solution 1: Ensure QuickBooks Desktop for Mac & MS Excel are updated

Perform the following steps to update QuickBooks Desktop for Mac.

  • First, open QuickBooks Desktop for Mac and head to QuickBooks.
  • Click the Check For QuickBooks Updates option.
  • Now, begin installing the latest available updates.
  • Launch Microsoft Excel and update Office. For that, move to the Help menu and then Check For Updates.
  • After the update is completed, relaunch your Mac.

Solution 2: Restart Mac in Safe Mode

The Safe Mode turns off unnecessary startup programs that may interfere with QuickBooks.

  • Initially, close the Mac system.
  • After that, restart your computer holding the Shift key.
  • Now, log in to Safe Mode.
  • Launch QuickBooks and then try to export the data.

Solution 3: Check System Requirements For QuickBooks Mac

Make sure that your computer meets the following system requirements to run QuickBooks for Mac easily.

  • The operating system required is Mac OS X v12.0 (Monterey) or later.
  • You must require an Intel or Apple CPU hardware.
  • A minimum of 2 GB RAM is required. For better performance, 4 GB RAM is recommended.
  • The storage space of up to 250 MB must be available.
  • A stable and high-speed internet connection is required.
  • Macintosh-compatible printer for invoices, checks, deposit slips, lists, purchase orders, mailing labels, reports, or graphs.

Precautions to Minimize the QuickBooks Export Problems

The following are the measures that you must consider to reduce the risk of export failures in the future.

  • Keep QuickBooks and Excel updated.
  • Verify that there is sufficient RAM and storage to export data from QuickBooks to Excel.
  • Also, verify that you delete the unnecessary Excel add-ins that are restricting QuickBooks.
  • Make sure not to export large reports.

Final Words

The QuickBooks freezes during exporting to Microsoft Excel issue occurs due to outdated software, damaged Excel components, or system conflicts. Whether you experience QuickBooks locking up when exporting to Excel, QuickBooks crashing during export, or being unable to export to Excel from QuickBooks, the solutions above can help resolve the issue effectively. Keeping both applications updated ensures smooth and error-free data export.

If the issue still continues, you can consult with our certified Qbookassist professionals for help.

Frequently Asked Questions

1. Why is my QuickBooks not exporting to Excel?

The QuickBooks not exporting to Excel issue mainly arises due to integration failure between the two apps, which is caused by incompatible Office versions, outdated software, or UAC settings interrupting the connection.

2. Is there a way to export QuickBooks to Excel?

The following are the steps to export QuickBooks to Excel.

  • First, move to Reports > Standard Reports.
  • Choose the report that you want to export and click Export to Excel.
  • Now, save the file to your desktop.

3. How do I change the export settings in Excel?

Ans. To change the export settings, move to the File menu > Options and then click Quick Access Toolbar. Choose the Import/Export from the bottom right and click Export all customizations.

4. Can Excel pull data from QuickBooks Desktop?

Yes, you can export reports as Excel worksheets in the following formats: .xlsx, CSV spreadsheets, or PDFs.

5. Why does QuickBooks freeze if I export a report to Excel?

QuickBooks freezes while exporting to Excel due to damaged Microsoft Excel components, outdated QuickBooks or Excel versions, corrupt report data, or issues with Excel export settings.

QuickBooks Error PSXXX: How to Fix Payroll Update Errors

It is essential that you keep your payroll software up to date for accurate tax calculations and smooth payroll processing. However, you may sometimes run into QuickBooks error PSXXX while downloading or installing payroll updates. This issue usually displays with messages like “Problem installing payroll tax update” and commonly includes errors such as PS032, PS033, PS036, and PS107.

QuickBooks Payroll update error PSXXX can result from an inactive payroll subscription, damaged CPS files, firewall restrictions, or internet connectivity issues. In this guide, we’ll explain the causes behind the QuickBooks PSXXX error series and provide proven solutions to resolve payroll update errors in QuickBooks Desktop.

What is QuickBooks Error PSXXX?

QuickBooks error PSXXX belongs to payroll update errors that occur in QB Desktop Payroll. These errors usually indicate a problem with payroll verification, corrupted files, or incomplete updates.

You can notice the following PSXXX error codes during the download of payroll tax table updates in QuickBooks Desktop.

PS033PS101
PS036PS107
PS032PS034

The error messages that appear while downloading the payroll updates are as follows;

  • QuickBooks encountered a problem updating payroll.
  • Payroll update did not complete successfully.
  • An internal file in QuickBooks has become unreadable [PS107].
  • A user has not registered QuickBooks software or the company file is damaged or corrupted.
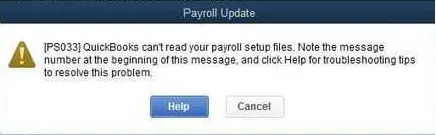
  • QuickBooks can’t read your payroll setup files. [PS033]
  • QuickBooks error PS034: The payroll update did not complete successfully.

What You Might Experience When Dealing With Error PSXXX

  • Payroll update fails to complete.
  • QuickBooks PSXXX error message appear repeatedly.
  • Tax table updates fail to download, or the update process stop in midway without any progress.
  • QB application begin to freeze during the update installation.
  • Payroll service become unresponsive.

Why Does QuickBooks Payroll Update Error PSXXX Occur?

Several technical and configuration issues may cause QuickBooks Payroll Update Error PSXXX while downloading and installing payroll updates. Understanding the causes behind this error will help you find the correct troubleshooting methods to fix the issue.

Here are some of the major causes that include;

  • Damaged files in the CPS folder.
  • Issues with the configuration of internet connectivity.
  • Inactive or invalid payroll subscription.
  • Incorrect Firewall settings may block payroll updates in QB Desktop.
  • Third-party security services are interfering with software updates.
  • Restricted user permissions in Windows.
  • An outdated QuickBooks Desktop version.

How to Resolve Payroll Update Error PSXXX in QuickBooks Desktop

After identifying the causes of Payroll Update Error PSXXX in QuickBooks Desktop, you can now follow the troubleshooting methods below to effectively fix the error and restore smooth payroll update functionality.

Method 1: Check Your Payroll Service Subscription

A valid and active payroll subscription is essential for the smooth installation of payroll tax table updates and to ensure you are using the latest tax tables. If the subscription is inactive or expired, it may result in payroll update issues. Follow the steps below to verify your payroll subscription.

  • Before starting, close all your company files and then restart your computer.
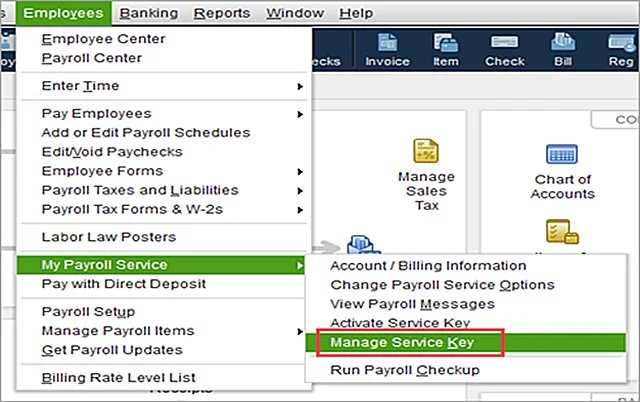
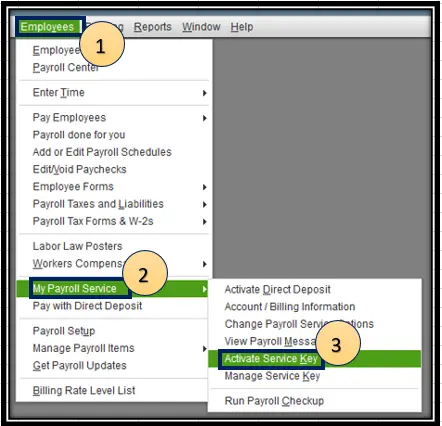
  • Open QuickBooks and go to Employees.
  • Choose My Payroll Service and click Manage Service Key.
  • Click Edit, and check your service key number. If it’s incorrect, enter the right one.
  • Hit Next, unmark the Open Payroll Setup box, and click Finish.
  • This will start downloading the entire payroll update. If the issue continues, move to the next solution.

Method 2: Register & Update Your QuickBooks Desktop

Having the latest security and software improvements will help enhance your accounting operations. Follow these steps to verify if your software is registered.

  • Hit the F2 key to bring up the Product Information window.
  • Look beside the license number, whether it shows Activated.

Important Tip: If it doesn’t show Activated, then register QuickBooks Desktop.

Follow these steps to register QuickBooks Desktop,  

  • Open QuickBooks Desktop.
  • Move to the Help menu and select Activate QuickBooks.

Now, perform the steps given on the screen to verify the software information. After registering QuickBooks to receive updates, try to update QuickBooks and payroll to the latest release.

Method 3: Repair Files in CPS Folder

Repairing the files in the CPS folder will help remove corrupted payroll tax table files and then replace them with new ones after renaming. Thus, it helps fix the QuickBooks error PSXXX series errors.

  • Open the File Explorer by pressing Windows + E.
  • Choose This PC and move to the Local Disk C.
  • After this, run the Program Files (x86) and open the Intuit folder.
  • Now, launch the QuickBooks Desktop folder and verify if it matches your current version.
  • Go to the Components tab and select the Payroll folder.
  • Right-click the CPS folder and click Rename. Mention a new folder name and hit Enter to change the name successfully.

Method 4: Repair Your QuickBooks Desktop

QuickBooks File Doctor is a perfect utility introduced by Intuit that helps fix the damaged program files or corrupted installation. Use the following steps to run the tool and resolve common program and installation issues.

Note: Before using these tools, make sure you have downloaded and installed the latest QuickBooks Tool Hub version.

A. Run Quick Fix My Program

  • Open the QuickBooks Tool Hub and click Program Problems.
  • Choose Quick Fix My Program.
  • Start QuickBooks Desktop and then open your company file.

B. Run QuickBooks Install Diagnostic Tool

If anything went wrong during the installation of QuickBooks Desktop, it may create issues while using the application. So, you must run the QB Install Diagnostic Tool to address the common installation issues.

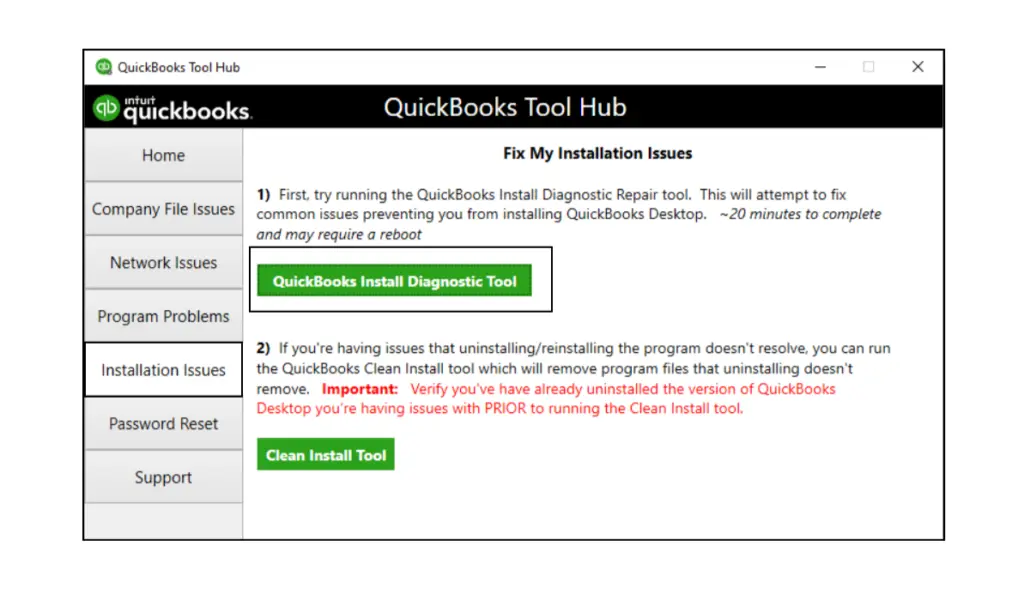
  • Launch the QuickBooks Tool Hub and click Installation Issues.
  • Choose QuickBooks Install Diagnostic Tool and let the tool run.
  • After running the tool, relaunch your computer and run QuickBooks Desktop. Then, try opening your company file.
  • Next, try to update your QuickBooks to the latest release. This will ensure that you have the latest fixes and security updates.

Method 5: Add the Defender Exclusion or Turn Off Windows Defender Antivirus Protection

The QuickBooks Tool Hub includes a feature that automatically adds QuickBooks Desktop files to the Microsoft Defender exclusion list, preventing the antivirus from scanning those files during installation or updates.

Tips:

  1. Make sure to log in to Windows with administrative rights.
  2. Ensure that the QuickBooks Tool Hub is previously installed on your computer.
  • Select Cancel to stop the ongoing update.
  • Exit from the QuickBooks program.
  • Open the QuickBooks Tool Hub. If you aren’t able to see the tool, download and install the latest QuickBooks Tool Hub version.
  • Move to the Installation Issues tab.
  • Now, hit the Add Defender Exclusion. If you see that this option is grayed out, it means that you don’t have admin rights on the PC. So, you have to ask your admin to apply these steps or get the access. You may also ask your admin to perform these steps.
  • Relaunch your computer and open QuickBooks.
  • At last, try to get the latest QuickBooks payroll update once again.

Method 6: Reinstall QuickBooks in Selective Startup Mode

Reinstalling QuickBooks Desktop in selective startup mode will prevent third-party apps from interfering with the payroll update process.

A. Switch to Selective Startup

To avoid interference from the background running apps, switch to Selective Startup mode. If you aren’t sure while performing these steps, connect with your computer’s manufacturer or a Windows expert.

  • Open the Run window by hitting Windows + R keys.
  • Type msconfig into the search box and click OK.
  • Head to the General tab and select Selective Startup and Load system services.
  • Choose the Services tab.
  • Circle the checkbox of Hide all Microsoft Services.
  • Hit the Disable All option and clear the Hide All Microsoft Services checkbox.
  • Tap the Windows Installer option from the list of services.
  • Select OK and click Restart from the System Configuration window.

B. Uninstall or Install QuickBooks Desktop

  • Reinstall QuickBooks Desktop.
  • Now, hit the Windows + R keys to bring up the Run window.
  • Type msconfig into the text box and click OK.
  • Move to the General tab and select Normal Startup > OK.
  • Click Restart from the System Configuration window.

Method 7: Configure Windows Firewall For QuickBooks

Firewall and antivirus programs are used to safeguard your device from any unauthorized access and harmful files. However, they may sometimes block QuickBooks Desktop services and prevent payroll updates from downloading successfully, which can trigger Payroll update error PSXXX. To fix this issue, you need to ensure that QuickBooks files and services are allowed through your security software.

Follow these steps to configure the firewall settings.

Add Firewall Port Exception

If you are running multiple versions of QuickBooks on the same device, perform the following steps.

  • Click on the Windows Start menu and type “Windows Firewall”.
  • Open the Windows Firewall and select Advanced Settings.
  • Right-click on Inbound Rules and hit New Rule.
  • Select the Port and then the Next option.
Add Firewall Port Exception
  • Verify that the TCP checkbox is marked.
  • Now, provide the specific ports for your QuickBooks year version:
    • QuickBooks Desktop 2020 and later: 8019, XXXXX.
    • QuickBooks Desktop 2019: 8019, XXXXX.
    • QuickBooks Desktop 2018: 8019, 56728, 55378-55382.
    • QuickBooks Desktop 2017: 8019, 56727, 55373-55377.
Note: QuickBooks Desktop 2019, 2020, and later versions use dynamic firewall ports that are automatically alloted during installation. These ports are specifically allocated to QuickBooks Desktop to built a secure network communication and ensure the application has exclusive access to a designated port for smooth multi-user connectivity and uninterrupted data exchange.
  • To find the dynamic port number, open the Start menu and search for QuickBooks Database Server Manager. Launch the QBDBMgrN utility and click the Port Monitor tab. Locate your QuickBooks Desktop version and write down your port number. You can then use this port number while configuring firewall exceptions.

Note: You can modify the assigned port number by choosing the Renew option. After changing the port, click the Scan Folders tab and select Scan Now to refresh the firewall permissions. Always, remember that port renewal is only available for QuickBooks Desktop 2019 and later versions. Whereas, the older versions doesn’t support this feature.

  • After entering the port number, click Next.
  • Select Allow the Connection and then hit Next again.
  • Ensure all network profiles are checked when prompted, then hit Next.
  • Create a new rule and assign it a name such as QBPorts(year).

Once the configuration is complete, click Finish to save the rule.

Repeat the same process to create Outbound Rules by selecting Outbound Rules instead of Inbound Rules in Step 4.

Finally, open QuickBooks Desktop and switch to multi-user mode. You can also test QuickBooks over the network from one of the host systems.

Create Windows Firewall Exceptions for QuickBooks programs

QuickBooks Desktop uses executable (.exe) files to perform various operations and services. If these files are blocked by Windows Firewall, it may interrupt QuickBooks functions and payroll updates. Follow the steps below to create firewall exceptions for each executable file listed in the table.

  • Open the Start menu, type Windows Firewall, and launch it.
  • Select Advanced Settings, then right-click Inbound Rules and choose New Rule.
  • Click Program and then select Next.
  • Choose This Program Path and click Browse.
  • Locate and select one of the executable (.exe) files from the list, then click Next.
  • Select Allow the Connection and hit Next again.
  • Create a new rule and name it something like QBFirewallException(name.exe).

Repeat the same procedure to create Outbound Rules by selecting Outbound Rules instead of Inbound Rules in Step 4.

AutoBackupExe.exeC:\Program Files\Intuit\QUICKBOOKS YEAR
Dbmlsync.exeC:\Program Files\Intuit\QUICKBOOKS YEAR
DBManagerExe.exeC:\Program Files\Intuit\QUICKBOOKS YEAR
FileManagement.exeC:\Program Files\Intuit\QUICKBOOKS YEAR
FileMovementExe.exeC:\Program Files\Intuit\QUICKBOOKS YEAR
QuickBooksMessaging.exeC:\Program Files\Intuit\QUICKBOOKS YEAR
QBW32.exeC:\Program Files\Intuit\QUICKBOOKS YEAR
QBDBMgrN.exeC:\Program Files\Intuit\QUICKBOOKS YEAR
QBServerUtilityMgr.exeC:\Program Files\Common Files\Intuit\QuickBooks
QBCFMonitorService.exeC:\Program Files\Common Files\Intuit\QuickBooks
QBLaunch.exeC:\Program Files\Common Files\Intuit\QuickBooks
QBUpdate.exeC:\Program Files\Common Files\Intuit\QuickBooks\QBUpdate
IntuitSyncManager.exeC:\Program Files\Common Files\Intuit\Sync
OnlineBackup.exeC:\Program Files\QuickBooks Online Backup

Best Practices To Avoid QuickBooks PSXXX Errors

The following are the important points you must consider to avoid QuickBooks PSXXX errors in the future.

  • Make sure to keep your QuickBooks Desktop updated.
  • Your Internet connection must be stable to install the payroll tax table updates uninterrupted.
  • Run payroll updates as an administrator.
  • Maintain the backup of the company file regularly.
  • Check your payroll subscription regularly.
  • Avoid interrupting updates midway.

Final Thoughts

QuickBooks error PSXXX can interrupt payroll processing, delay tax updates, and affect employee payments if not fixed quickly. These payroll update issues are commonly associated with corrupted CPS files, inactive payroll subscriptions, firewall restrictions, or outdated QuickBooks Desktop versions. Fortunately, fixing the update error PSXXX in QuickBooks becomes easier by applying the right troubleshooting solutions outlined above.

Regular software updates, proper firewall configuration, and routine company file maintenance can help prevent QuickBooks PSXXX error series errors in the future.

Frequently Asked Questions

What causes PSXXX error codes when downloading payroll updates in QuickBooks Desktop?

The QuickBooks error PSXXX is caused due to various causes including incorrect internet settings, firewall settings blocking payroll updates, or issues with the QuickBooks version.

Why are QuickBooks payroll updates not working?

The QuickBooks payroll updates not working issue may arise due to insufficient user permissions, interrupted downloads, or installation errors.

Why is PS038 a problem in QuickBooks?

QuickBooks error PS038 may occur when paychecks are stuck as “Online to Send”, preventing payroll updates and tax table downloads in QuickBooks Desktop.

What does “Online to Send” mean in QuickBooks?

It means that a paycheck has not successfully synced with Intuit payroll servers. If these paychecks remain stuck, QuickBooks may continuously start displaying PS038.

What is the CPS folder in QuickBooks?

The CPS folder in QuickBooks is used to keep payroll-related update files. If these files get corrupted, payroll updates may fail and trigger PSXXX errors. Renaming the folder forces QuickBooks to create fresh payroll update files.

QuickBooks lowes synchrony bank card login issue: 5 Easy Fixes

QuickBooks lowes synchrony bank card login issue often appears when users fails to link or update their lowe’s credit card transactions. As a result, it started displaying errors such as 101, 103, 105, or 108. This is mainly caused by incorrect login credentials, bank server maintenance, or important security prompts on the Synchrony website.

In this guide, we have described all the possible causes and troubleshooting methods to fix the Lowe’s Synchrony Bank card login issue in QuickBooks.

Causes behind QuickBooks Lowes Synchrony Bank Card Login Issue

There are multiple factors that triggers QuickBooks lowes synchrony bank card login issue due to the following reasons.

  • Server downtime from the end of Synchrony Bank.
  • Using the wrong login credentials during the Lowes credit card login, Synchrony Bank sign up.
  • Accessing the outdated QuickBooks version.
  • Problems related to the Lowe’s credit payment login in Synchrony.
  • Web browser or cache-related problems.

How to identify the occurrence of QuickBooks lowes synchrony bank card login issue?

The following are the signs and symptoms that help you identify the QuickBooks low synchrony bank card login issue.

How to Fix Lowe’s Synchrony Bank Card Login Issue in QuickBooks?

Following are the effective troubleshooting methods to address lowe’s synchrony bank card login issue in QuickBooks.

Solution 1: Send a Service Request to Add the Bank

Whenever you come across a Lowe’s Synchrony bank card login issue, you need to submit a request to add this specific bank. For that, use the steps instructed below.

How to add a new Bank account in quickbooks?
  • Open the QuickBooks application and go to the dashboard.
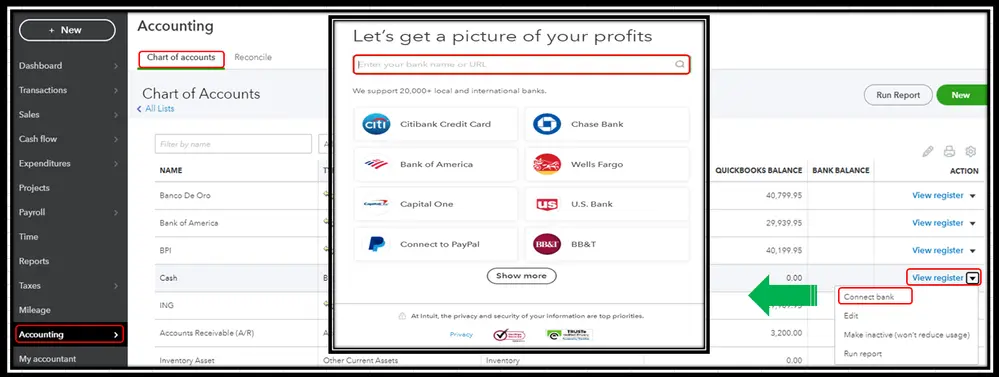
  • From there, choose the Banking menu and click the Add Bank Account option.
  • Now, type your URL or bank name into the form that opens on the screen.
  • Hit the Enter key, and it will update the right bank name.
  • After completing, tap on Request Support for your Bank option.
  • Afterwards, provide the bank’s web address (URL).
  • Finally, hit the Request tab to submit the request.

Solution 2: Manually Import the Transactions

For manually importing the transactions into your system through WebConnect, sign in to your bank’s website. Then, start downloading a WebConnect file, like CSV.QFX, QBO, and OFX.

Manually upload transactions into QuickBooks Online - Intuit
  • Initially, sign in to your bank’s website and download a WebConnect file (CSV, QFX, QBO, or OFX).
  • After this, open QuickBooks and move to the Banking menu.
  • Hit the File Upload option by clicking the Update drop-down menu.
  • When you see that no bank account is connected, select to upload transactions manually.
  • Now, hit the Browse and choose the downloaded file.
  • Head to the Lowe’s Advantage and click the Next tab.
  • After that, go through the instructions given on the screen to map the fields.
  • Choose the transaction that you wish to import.
  • At last, hit the Yes and then the Let’s Go option.

Solution 3: Resolve Bank Error 103

The QuickBooks Error 103 mainly appears due to incorrect user ID and password, or if it’s not accepted by the bank. So, to fix the issue, perform the following steps.

First Step: Confirm Your Sign-In Details

QuickBooks supports multiple banks, such as Lowe’s Synchrony Bank. Therefore, to sync your bank account with QuickBooks, ensure that you enter the relevant login credentials.

  • Firstly, launch your web browser and visit your bank’s website.
  • After this, review your bank’s website address.
  • Now, log in with your user ID and password. If you have multiple accounts, sign in to the one you wish to connect with QuickBooks.
  • You have signed in successfully to your bank account.
  • At last, for Error 103, reset your password and user ID according to your bank instructions.

Second Step: Enter Your Bank Sign-In Info in QuickBooks

Now, you can log in to your bank account in QuickBooks using an existing or new connection. Use the procedure given below according to your connection.

  • Initially, choose the Banking menu.
  • For the first-time connections, hit the Connect Account option. Whereas, opt for the Link account for the previous connections.
  • Within the search field, mention your bank’s name or web address from Step 1.
  • Now, choose your bank name from the search results.
  • After this, clear any saved login details and mention the user ID and password. Then, access the “Use” option for the verification.
  • At last, hit the Continue option to complete.

Conclusion

We hope that by performing the troubleshooting methods listed above you can easily fix the QuickBooks lowes synchrony bank card login issue. Thus, it will let you link or update QuickBooks with the Lowe’s Synchrony bank card account. If the issue still persists, then have a one-to-one consultation with our Qbookassist professionals for fast resolution.

Frequently Asked Questions

Why is my Lowes card not working?

Lowes card not working issue may often arise due to an over-limit balance, account closure for inactivity, fraud protection alerts, expired cards, or due to some technical glitches with the payment system.

How to prevent QuickBooks lowes synchrony bank card login issue?

Take care of the following things to avoid the QuickBooks Lowes Synchrony Bank card login issue.

  • Provide the accurate login credentials for Synchrony Bank.
  • Enable the Multi-Factor Authentication if required.
  • Disable the antivirus/firewall temporarily.
  • Consider backing up QuickBooks data regularly.

Is Lowes associated with Synchrony Bank?

Yes, the Lowes credit card is issued and managed by Synchrony bank.

Why can’t I login to my Lowe’s Synchrony Bank Account?

You might fail to log in to the Lowe’s Synchrony bank account due to incorrect login details, browser issues, or if the account is locked.

QuickBooks Desktop 2023 Discontinued: What’s Your Next Move

Did you receive an email informing you about the QuickBooks Desktop 2023 Discontinued policy?

If yes, then no need to worry, as your software is not going to stop immediately. According to the latest updates, the product will be discontinued after 31st May 2026. This change will affect certain services, including payments, bank feeds, live support, and security updates. However, if you want to continue working with QuickBooks Desktop without interruptions, you should move to QuickBooks Online or upgrade to the latest Desktop version.

QuickBooks Desktop 2023 Discontinued

In this guide, we have explained about the products and services affected by the discontinuation, and what users should do after the QuickBooks Desktop 2023 discontinuation policy takes effect.

Reasons Why QuickBooks Desktop 2023 is Being Discontinued

Many users ask, “Is QuickBooks Desktop ending in 2023?” or “Is QuickBooks Desktop being phased out in 2023?”

The answer is that Intuit is gradually retiring older Desktop versions to encourage users to adopt upgraded software with better performance, security, and cloud capabilities. The main purpose behind the QuickBooks Desktop 2023 discontinued policy is to provide users with improved security enhancements and upgraded features available in newer versions of QuickBooks.

Other reasons behind the discontinuation include:

  • Reduced maintenance and support costs incurred on older Desktop versions.
  • Easy to get automatic updates and security improvements.
  • Get access to the upgraded cloud-based features and integrations.

What Does QuickBooks Desktop 2023 Discontinuation Policy Mean to Users?

After the QuickBooks Desktop ending announcement, users should understand that the software may continue to open locally, but several connected services will stop working.

  1. Intuit will stop providing the live support facility for the QuickBooks Desktop 2023 users.
  2. The software will no longer receive the latest tax table updates, which can affect payroll and compliance.
  3. Payroll services such as Assisted Payroll, Basic or Enhanced Payroll, and QuickBooks Workforce will be impacted.
  4. Other connected services, including Accountant Copy Transfer Service, Contributed reports, Online Banking, Email, and Shipping Manager.
  5. Users will lose access to Intuit services, i.e., QuickBooks Desktop Payroll, Desktop Payments, or online bank feeds.
  6. Critical security updates will no longer be available.
  7. Integrated services like payroll basic, standard, enhanced, generator of payroll tax forms, payroll tax calculations, online payroll filing, and employee-side access through workforce tools.

What are the Risks of Continuing With an Older QuickBooks Desktop Version?

Many businesses delay upgrading QuickBooks Desktop due to cost concerns. However, using an unsupported version of QuickBooks may create serious operational and security risks.

1. Security Risks-

Without the latest security patches and updates, outdated QuickBooks Desktop software is more vulnerable to cyber threats and malware.

2. Tax Compliance Issues-

Payroll tax rates and forms change more frequently. Using the older QuickBooks Desktop 2023 version will calculate the taxes incorrectly.

3. Lack of Technical Support-

If your company file gets corrupted or an error appears while running QuickBooks Desktop 2023 version, Intuit will not be able to provide support for its users.

4. Data Corruption Risks-

Any latest updates in the QuickBooks Desktop will not be able to support the older QuickBooks Desktop 2023 version.

5. Bank Compatibility Problems-

Banks keep updating the security protocols regularly. Using the older QuickBooks version may fail to connect with your bank account.

Products Affected by the QuickBooks Desktop 2023 Discontinuation

After QuickBooks Desktop Ending 2023 products, the following are the products that are going to be affected.

  1. QuickBooks Desktop Pro Plus 2023
  2. QuickBooks Enterprise Solutions 23.0
  3. QuickBooks Premier Accountant Edition Plus 2023
  4. QuickBooks Desktop Premier Plus 2023 (General Business, Contractor, Manufacturing & Wholesale, Non-profit, Professional Services, and Retail).
  5. QuickBooks Enterprise Accountant 23.0
  6. QuickBooks Desktop For Mac Plus 2023

Is QuickBooks Desktop 2023 Going To Stop Completely?

After the QuickBooks Desktop 2023 discontinuation, you can still use the company files, view, and edit existing data. Moreover, you can also do basic bookkeeping or data entry with QuickBooks Desktop 2023 even after the discontinuation.

According to Intuit, you can still use the unsupported QuickBooks Desktop version. But there is no guarantee for support, updates, or integration functionality. Besides this, many connected services will also stop working, which may limit the use of the QuickBooks software.

Options For Current QuickBooks Desktop 2023 Users

After the end of QuickBooks Desktop 2023 version, you can either switch to QuickBooks Online or the latest version of QuickBooks.

1. Upgrade to QuickBooks Desktop 2024 or Enterprise 24.0

Current QuickBooks Desktop 2023 and Enterprise users is advised to switch to the 24.0 version without paying any extra charges. Moreover, you can also upgrade your products to avoid service interruptions and get the latest security updates.

2. Move to QuickBooks Desktop Enterprise

You can also shift to QuickBooks Desktop Enterprise, which offers an upgraded desktop solution to its customers. Besides this, you can also use the following features.

  • The users can do everything from basic bookkeeping to inventory and multi-entity management, multi-location capabilities, and built-in payroll.
  • You can also manage your accounting, payroll, sales, and inventory across different locations and entities.
  • Moreover, you can create over 200 customizable reports, including industry-specific and job costing reports.
  • Also, you can get around 115 unique work activities and automate the workflow using predefined approval rules.

3. Move to QuickBooks Online

Another great option for the QuickBooks Desktop 2023 users is that they can move to the QBO application. They can access the cloud-based functionality and continue with their ongoing tasks easily.

Conclusion

We hope this guide has helped you understand the QuickBooks Desktop 2023 discontinued policy and the products and services affected by it.

Although the software may continue working locally after May 31, 2026, users will lose access to important services such as payroll, online banking, payments, live support, and security updates. To avoid disruptions, businesses should consider upgrading to the latest QuickBooks Desktop version or moving to QuickBooks Online.

If you still need assistance regarding the QuickBooks Desktop 2023 discontinuation, feel free to contact our Qbookassist professionals for expert guidance and support.

Frequently Asked Questions

How do I update QuickBooks Desktop from 2023 to 2024?

For updating QuickBooks Desktop from 2023 to 2024, perform these steps;

  • Initially, visit the QuickBooks Desktop homepage and launch your company file.
  • Now, hit the Upgrade QuickBooks option and click the Find out what’s new option.
  • Start looking for the latest QuickBooks version and see the system requirements to upgrade.

How long can I use QuickBooks Desktop 2023?

The QuickBooks Desktop 2023 is going to discontinue after 31st May 2026.

Do I need to renew my QuickBooks Desktop every year?

If you want to see your data after one year, then you have to renew your QuickBooks subscription.

What will happen if you don’t upgrade after QuickBooks Desktop 2023 discontinuation?

Even after the QuickBooks Desktop 2023 discontinuation, if you don’t upgrade, then you will lose access to Intuit services such as QuickBooks Desktop Payroll, Desktop payments, or online bank feeds. Also, you won’t be able to get the critical security updates.

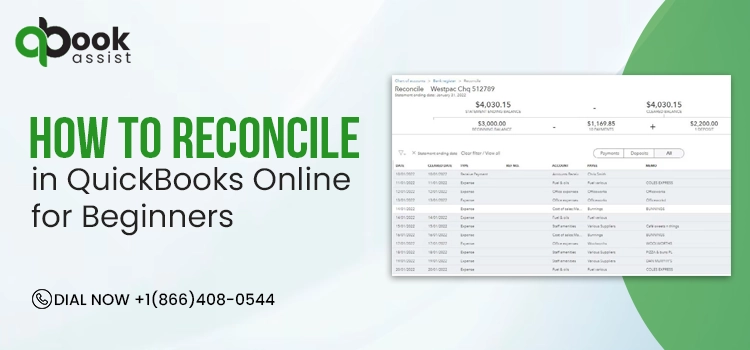
How to Reconcile in QuickBooks Online Without Mistakes? Easy Guide

For new QuickBooks users, reconciling accounts for the first time may seem challenging. However, once they learn how to reconcile in QuickBooks Online, it becomes straightforward to maintain accurate financial statements and spot discrepancies easily. In this comprehensive guide, we’ll walk you through QuickBooks reconciliation steps, how to undo a reconciliation, reconcile for previous years, or how to reconcile undeposited funds.

QuickBooks reconciliation mistakes to avoid

What does it mean to reconcile an account?

Reconciling an account in QuickBooks Online is the process of comparing your transaction records with your bank or credit card statement to ensure accuracy. This process lets you find out discrepancies and ensure that your accounts are up-to-date.

Quick Pre-Reconciliation Checklist for Accurate Results

Before reconciling the account in QuickBooks, it’s essential to sort out a few things.

  • Ensure all bank transactions are reviewed and correctly categorized. Un-categorized or misclassified transactions will prevent successful reconciliation.
  • Your bank or credit card statement is the final reference. So, make sure to reconcile with them, not what’s displayed in QuickBooks.

How to reconcile in QuickBooks Online for the first time?

Perform the steps instructed below for reconciling in QuickBooks Online for the first time.

  • Move to the Accounting menu and click the Reconcile option.
  • Choose the account that you wish to reconcile and verify the opening balance given in QuickBooks.
  • Now, mention your
    • Ending balance
    • Ending date (from your bank statement)
  • After this, click the Start Reconciling option.
  • Start comparing each transaction with your bank account.
  • Next, mark them as cleared when they match.
  • You must continue until the difference becomes zero.

If you see that the opening balance doesn’t match your bank statement.

  • Check the earlier transactions.
  • Look for the missing or duplicate entries.
  • Prevent forcing adjustments.

Once everything tallies and the difference is zero, it means that your first transaction is complete.

How to Reconcile in QuickBooks Online With Easy Steps?

Performing the reconciliation in QuickBooks Online will ensure that your records match bank or credit card statements. As a result, it will help in preventing any discrepancies or errors. Here’s how to reconcile a credit card in QuickBooks Online.

First Step: Select an account to reconcile

After getting your monthly bank or credit card statement, you can reconcile your accounts. If you have to reconcile for more than one month, do one statement at a time and start from the older one first.

  1. First, click the Gear icon from the top-right corner.
  2. Choose Reconcile and then pick the account you wish to reconcile. For that, click the account from the drop-down menu list.
  3. Verify that the account you choose tallies with the account you want to reconcile your bank or credit card statement.

Second Step: Start the reconciliation

If your bank accounts are linked with online banking, ensure that you match and categorize all of your downloaded transactions.

Important Tip: If you get a message regarding a previous reconciliation, fix it before you move ahead. For that, choose “We can help you fix it.”

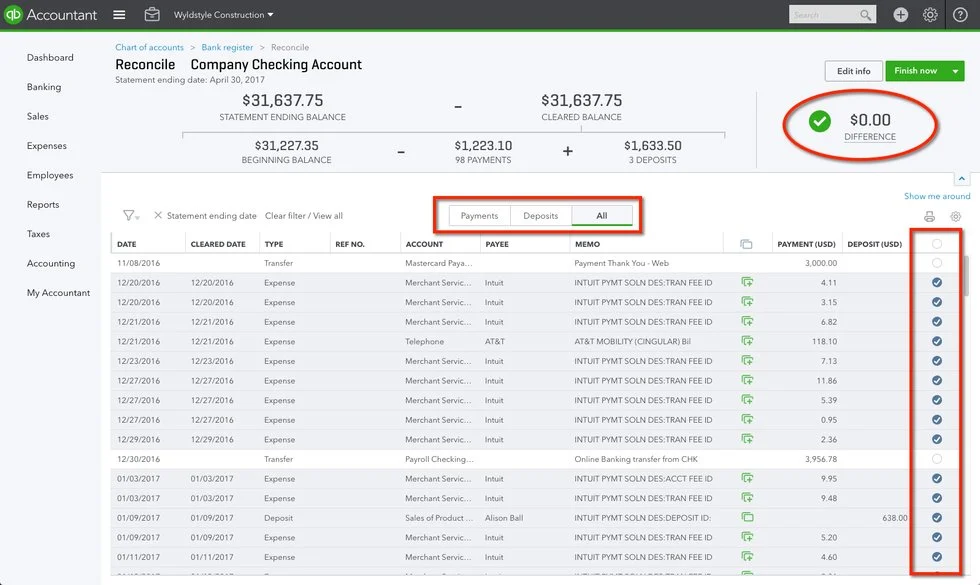
  1. Check the Beginning Balance. Verify that the beginning balance in QuickBooks must tally with the one mentioned on your statement.
  2. Now, mention the Ending balance and Ending date as it is given on your bank or credit card statement. A few banks call the ending balance a new balance or a closing balance.
  3. If you see it, check the Last statement ending date. This is basically the end date of your last reconciliation. Your present bank statement will begin the day after it.
  4. Finally, hit the Start reconciling option to finish the reconciliation process.

Third Step: Review and match transactions

Once you enter the statement date and ending balance, you will get a list of transactions that must be checked and matched.

  1. When you are in the Reconciliation window, match the first transaction on your statement with the one listed in QuickBooks.
  2. If the transaction matches, circle the checkbox to mark it as Reconciled. If the transaction in QuickBooks isn’t available on the statement, avoid marking the checkbox.
  3. Now, repeat the same process for all transactions given on your statement.
  4. If your transaction matches but has incorrect details, say the payee, choose the transaction to expand it. Then, click Edit and do the required corrections to tally your statement.

Fourth Step: Finish the reconciliation

Once all transactions are marked, make sure that the difference is CA $0.00.

  1. If the difference is $0.00, click Finish now to complete the reconciliation.
  2. If you need to stop, you must save your progress and finish later.

Fifth Step: Review past reconciliations

To check the previous reconciliations, run a reconciliation report to check your work.

  1. Click the Settings icon and choose Reconcile (Take me there).
  2. Hit the History by account option.
  3. Now, using the drop-down menus, choose the account and date range. Otherwise, either print or export your reconciliation reports if you want to share them.

Sixth Step: Edit completed reconciliations

Herein, you can do the necessary changes to past reconciliations, but changes made to the completed reconciliations may unbalance your accounts and other reconciliations. However, it may also hamper the beginning balance of your next reconciliation.

Now, begin the process by checking your previous reconciliation report. If any transaction is reconciled by mistake, then you need to un-reconcile it. However, if you have adjusted a reconciliation by mistake, or you need to start over, consult with your accountant.

How to reconcile undeposited funds in QuickBooks Online?

To reconcile the undeposited funds in QuickBooks Online, you first have to view the Undeposited Funds account using the steps below.

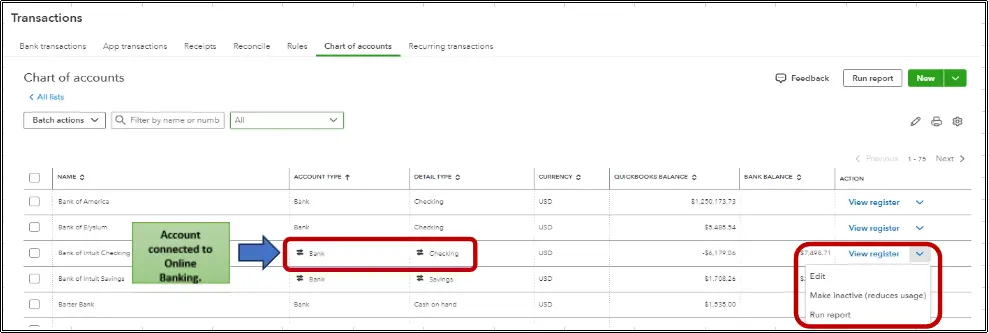
  1. Initially, choose the Accounting menu and click Charts of Accounts.
  2. After this, look for Undeposited Funds from the list.
  3. Choose the View Register option.

Now, to reconcile the transactions that are in our Undeposited Funds account, you can deposit these payments to the corresponding bank accounts. From there, you can reconcile the bank from which you can deposit the funds. For reference, proceed with the steps we discussed in the above section.

How to reconcile previous month/ year in QuickBooks Online?

Perform the below-given steps to reconcile previous month or year transactions, perform the steps instructed below.

  • Initially, head to the Banking menu and click Reconcile.
  • After doing that, click the Account drop-down menu and pick the bank account you wish to reconcile.
  • Now, pick the date from the financial statement and mention the ending balance from your statement.
  • After this, match the amount on the Beginning Balance with the opening balance on the oldest statement you wish to reconcile. If the beginning balance won’t match, the reconcile window beginning balance is zero or incorrect.
  • Provide the total Service Charge and Interest Earned.
    • Start adding the service charge from all financial statements for the year or portion of the year you want to reconcile. Then, enter the total into the Service Charge field.
    • Also, list the statement date from the chosen financial statement.
    • Click the Account drop-down and pick the accurate account for the service charge.
    • Repeat the same steps from 6a through 6 c for interest earned, and mention the amount in the Interest Earner field.
  • Choose the Continue option to launch the Reconcile window.
  • Click Hide transactions after the statement’s end date in the upper right corner of the screen. With this, QuickBooks starts displaying only the transactions that are dated on or before the statement date.
  • Circle the checkbox column beside each transaction that displays on the financial statement you choose.
  • Next, check the difference amount in the bottom right corner of the Reconciled window.
    • If the amount you see is 0.00, click Reconcile Now. It states that your account is reconciled.
    • If you see that the amount isn’t 0.00, it means that the account doesn’t balance for the period. You need to pick any one of the following options;
      • Repeat the same steps again, ensuring all amounts and transactions have been recorded properly.
      • Choose the Reconcile Now tab and then Enter Adjustment. Then, QuickBooks will provide an adjustment for you to reconcile the account. Note down all the adjustments you have done so that you can tally them with your accountant.

How to undo a reconciliation in QuickBooks Online?

You must have a QuickBooks Online Accountant subscription to undo an entire past reconciliation. Here are the steps.

Option 1: Undo an entire reconciliation in QBO Accountant

You must know that the Undo option is only available to accountants who are linked with the QBO account. If you haven’t sent an invitation to your accountant, connect them. Once connected, complete this on your behalf by performing these steps.

  1. Access your client’s company file in the QBO application. Choose All Apps > Accounting > Reconcile.
  2. Now, click History by Account and choose the account you wish to unreconcile with the date range.
  3. Look for the reconciliation you want to undo.
  4. Go to the Action column, click the drop-down ▼, then select Undo.
  5. Now, click Yes and select the Undo option.

Option 2: Manually unreconcile transactions one at a time (All QuickBooks Online users)

Perform the following steps to change a transaction’s status from reconciled (r) to uncleared.

  1. Open All apps, then go to Accounting and select Chart of accounts.
  2. Find the account that includes the transaction and click View register.
  3. In the list, look for the specific transaction—reconciled entries are marked with an “R” in the checkmark (✔) column.
  4. Click the transaction to expand its details.
  5. Then click the “R” box in the checkmark column repeatedly until it becomes blank. This will change the status from R (Reconciled) to C (Cleared) and finally to Blank (Uncleared).
  6. Click Save.
  7. Repeat these steps for each transaction you want to unreconcile.

Read More:- QuickBooks Online Login

Conclusion

We hope that now you have understood how to reconcile in QuickBooks Online for maintaining accurate financial records and spotting discrepancies. By following the steps listed above, you can easily reconcile a bank, credit card account, or undeposited funds to prevent certain mistakes.

If you are still having any doubts, feel free to connect with our Qbookassist professionals to get the right assistance.

Frequently Asked Questions (FAQ’s):-

Question 1: How to reconcile a bank statement in QuickBooks Online?

Ans. To reconcile a bank statement in QBO;

  • Move to the Settings icon and click the Reconcile option.
  • After this, provide the statement ending date and balance.
  • Match the transactions to ensure that the difference is $0.00.

Question 2: How to re-reconcile in QuickBooks Online?

Ans. To re-reconcile in QuickBooks Online;

  • Open the QuickBooks Online app and go to the Bookkeeping option.
  • After this, choose Reconcile and then History by Account.
  • Once done, click Undo on the desired report.

Question 3: What are the QuickBooks reconciliation mistakes to avoid?

Ans. The following are the QuickBooks reconciliation mistakes to avoid:

  • Make sure that the opening balances match the statement.
  • Delete or edit the transactions that were reconciled in the last month.
  • Sometimes, trusting automated bank feeds can create duplicates.

Question 4: What does it mean to reconcile an account on QuickBooks Online?

Ans. Reconciling in QuickBooks Online is a process that enables you to match your internal bank records with your bank or credit card statement to ensure accuracy.

6 Proven Ways to Complete QuickBooks Online Account Recovery [2025]

You open your browser, go to QuickBooks Online, type your password — and nothing happens. Or worse, you get a message saying your account has been locked, your email is not recognized, or your credentials have changed without your knowledge. Your entire financial history — invoices, payroll records, tax data, bank transactions — is sitting behind a login screen you cannot get past. This is one of the most stressful situations a small business owner or accountant can face. And it happens more often than you think.

The good news is that QuickBooks Online account recovery is possible in most cases — if you follow the right steps in the right order. In this guide, we walk you through every recovery path available, what to do if standard methods fail, and when to call a certified QuickBooks specialist to get your access back fast.

If your account lockout has also resulted in file damage or data loss, our QuickBooks data recovery services team can help you retrieve everything safely. we have helped hundreds of business owners recover their QuickBooks Online accounts — including cases involving hacked accounts, forgotten credentials, and failed Intuit verification processes.

First — Figure Out Exactly Why You Are Locked Out

Before you do anything else, be honest with yourself about what actually happened. The recovery path you take depends entirely on this answer.
There are really only four situations people find themselves in:

You forgot your password but still have access to your email — this is the easiest case and you will be back in within ten minutes.

You forgot your password and no longer have access to the email on the account — maybe it was an old work email, a provider you left, or an address set up by a former employee. This takes longer but is still very fixable.

Someone got into your account without your permission and changed things — this is the most urgent situation and needs to be treated completely differently from the others.

You never had your own login because someone else set up the account for you and now they are gone — a former bookkeeper, an old accountant, or an IT person who left the company. This happens more than most people realize.

Knowing which bucket you are in saves you hours of going in circles. Now let us get you back in.

Step-by-Step: QuickBooks Online Account Recovery Methods

Work through these solutions in order.

Method 1 — The Simple Password Reset (Start Here Always)

If you still have access to the email address connected to your QuickBooks account, stop reading and do this right now.

Go to quickbooks.intuit.com. Click Sign In. Click “I forgot my password.” Type your email. Hit Continue.

Intuit sends you a reset link. It arrives within a few minutes. Click it, create a new password, and you are back in. The whole thing takes about eight minutes on a normal day.

Two things trip people up here. First — the reset link expires in thirty minutes. Not a day. Not an hour. Thirty minutes. If you get the email, click it immediately. Second — check your spam folder. Intuit emails get filtered more often than you would expect, especially if you are using a corporate email system or a strict spam filter.

Real talk from our team: About half the calls we get about account recovery are solved right here. The user had the right email, just did not think to check spam. Always check spam before moving forward.

If you tried this and the email never arrived — or the email address itself is the problem — keep reading.

Method 2 — Account Recovery Through Your Phone Number

Here is something a lot of people do not know. Intuit can send a recovery link to your phone instead of your email.

Here is something a lot of people do not know. Intuit can send a recovery link to your phone instead of your email.

On the sign-in screen, click “I forgot my password” and then look for “Try something else” or “Use your phone number instead.” Enter the phone number that was on the account when it was created. Intuit texts you a code. You enter the code, reset your password, and you are in.

This works beautifully when your original email is gone but your phone number has stayed the same. The one catch is that the number must be the exact one registered to the account. If you changed numbers since setting up QuickBooks, this route will not work.

If it does work — great. But before you do anything else, go into your Intuit Account Settings and update your email to one you actually use today. Otherwise you will be back here doing this again in six months.

Method 3 — The QuickBooks Online Account Recovery Form

This is the path most people need when both their email and phone access are gone.

Intuit QuickBooks Online account recovery form submission

Intuit has a formal QuickBooks Online account recovery request process specifically for these situations. It is not the fastest process in the world — we will be honest about that — but it works when nothing else does.

QuickBooks Online account recovery password reset steps

To get there, go to help.quickbooks.intuit.com and look for the account recovery or lost access option. You will need to contact Intuit directly and tell them clearly that you cannot access the email or phone on your account and need to verify your identity another way.

What they will ask you for:

The last four digits of the credit or debit card used for your QuickBooks subscription. Your subscription confirmation email or order number. The name and address the business account is registered under. Sometimes a government-issued ID depending on the case.

The more of this information you have ready before you contact them, the faster it goes. People who go in unprepared end up waiting days longer than they need to.

From our experience at QBookAssist: We always tell clients to dig up their original QuickBooks subscription confirmation email before calling Intuit. That single email — with the order number and billing details — cuts the QuickBooks Online account recovery request time in half in most cases. Check your email inbox and search for “Intuit” or “QuickBooks” going back to when you first subscribed.

Method 4 — What to Do If Your Account Was Hacked

This situation is different. Do not treat it like a normal QuickBooks Online recovery — treat it like an emergency, because that is what it is.

If someone changed your password, email, or account details without your permission, your financial data is potentially exposed to an unauthorized person right now. Every minute matters.

Call Intuit support directly by phone. Do not fill out a form. Do not wait for an email. Call. Tell them immediately that your account has been compromised and that you need them to flag it for security review. Ask them to prevent further changes to the account while you work through verification.

After you say the word “compromised” to Intuit’s team, the case gets treated with more urgency than a standard locked account. That word matters — use it.

While Intuit is working on restoring your access, do these two things simultaneously. Change the password on the email account associated with QuickBooks — because if someone got into QuickBooks, they may have gotten into your email too. And contact your bank to let them know your accounting software may have been accessed without authorization.

Once you are back in, do not just sigh with relief and move on. Go straight to Settings > Manage Users and look at every single user on the account. Remove anyone you do not recognize. Then run a full QuickBooks Online account reconciliation and check your recent transaction history carefully for anything that looks wrong.

Method 5 — Ask Your Accountant or Another Admin User

Sometimes the fastest solution is a phone call — not to Intuit, but to whoever else has admin access to your QuickBooks account.

If your accountant, bookkeeper, or any team member has admin-level access to your QuickBooks Online company, they can log in and fix your access from inside the account. They go to Settings > Manage Users, find your name, and either resend your invitation or update your email address directly.

This bypasses Intuit’s entire recovery process. No forms, no waiting, no identity verification. You are back in within minutes.

If your accountant uses QuickBooks Online Accountant — the professional version of QBO used by accounting firms — they have even more access tools available through their accountant portal.

Call your accountant first. Seriously. It is the most underused recovery path there is.

Method 6: Contact Intuit Support Directly for Complex Recovery

If all of the above methods fail, you need to speak directly to Intuit’s account recovery team.

When contacting Intuit support for a QuickBooks Online account recovery request, be prepared with:

  1. Your full legal name as it appears on the account
  2. Business name and address
  3. The email address originally used to create the account
  4. Your QuickBooks subscription plan and billing amount
  5. Last four digits of the credit card on file
  6. Any subscription confirmation emails or order numbers

Intuit’s verification process for complex recovery cases can take 24–72 hours. Once your identity is confirmed, they will restore access and help you update your login credentials. Once you are back in your account, download the QuickBooks Tool Hub to run a quick diagnostic check on your company file and network health.

QuickBooks-Tool-Hub

What to Do The Moment You Get Back In

After recovering your account, if your company file throws up network issues, check our guide on QuickBooks Error H202 — it is one of the most common errors users face after a disruption.

Getting back into your account is step one. But a lot of people log back in, exhale, and then just go back to work as if nothing happened. That is a mistake. The first thing to do — before opening a single invoice or running a single report — is verify that your data is intact.

Run your QuickBooks Online accounts receivable report right away. Go to Reports > Accounts Receivable Aging Summary. Scan for any invoices that look off, any balances that seem wrong, or any customers that should not be there.

Then go to Accounting > Reconcile and do a quick QuickBooks Online account reconciliation check. Look at your most recent bank reconciliation and verify the closing balance matches what your bank shows. If anything looks different from what you remember, flag it before you touch anything else.

Check your bank feed connections under Banking. Make sure all your accounts are still connected and syncing. Sometimes during account recovery — especially in hacked account situations — bank connections get disconnected.

Finally, go to Settings > Manage Users and audit every user on the account. Make sure every person listed should actually have access.


QBookAssist tip: Export a full backup of your data immediately after recovery. Go to Settings > Export Data and download everything. Store it somewhere outside of QuickBooks — a Google Drive folder, an external hard drive, anywhere secure. If you ever face another access issue, you will have a copy of your data no matter what.

How Long Does QuickBooks Online Account Recovery Actually Take?

We get asked this constantly. Here is an honest answer — not the optimistic one Intuit’s website implies.

SituationRealistic Timeframe
Password reset with working email5 to 15 minutes
SMS recovery with working phoneUnder 10 minutes
Recovery through accountant or adminImmediate
Account recovery form — simple case24 to 48 hours
Hacked account recovery2 to 4 days
Complex identity verification case3 to 7 business days

The honest reality is that complex cases — missing email, missing phone, deactivated accounts, or compromised accounts — can take longer than Intuit’s website suggests. We have seen cases drag on for over a week when the original account holder is completely unreachable and business documents are hard to locate.

This is why preparation matters. Having your subscription details, billing records, and a trusted admin user on the account before a crisis hits makes all the difference.

When Self-Service Recovery Is Not Enough

Intuit’s recovery tools are genuinely good for straightforward cases. But some situations go beyond what their automated system handles well — and sitting on hold waiting for tier-one support to escalate your case is not a luxury every business has.

Consider calling a certified QuickBooks specialist if:

Your recovery request has been pending with Intuit for over 48 hours without any meaningful update. The account was originally set up by someone who is no longer available—such as a former employee, a dissolved accounting firm, or an IT contractor—leaving you with limited information to verify ownership. To make matters worse, the account has been compromised, so you urgently need assistance to secure it and conduct a full audit. You are facing a hard deadline — payroll, a tax filing, a client audit — and cannot wait days for Intuit’s standard process.

At QBookAssist, we handle these exact situations regularly. Our team works directly alongside Intuit’s recovery process, helps you gather the right documentation, and advocates on your behalf to speed things up. We also do the full post-recovery audit to make sure your data is completely intact before you go back to business as usual.

Call us at +1-866-408-0544 — if you are locked out of QuickBooks Online right now, do not spend another day waiting.

Five Things to Do Right Now to Never Face This Again

Once you are back in — and this is important — spend fifteen minutes doing these things before you do anything else.

QuickBooks Online account Security

Turn on two-step verification immediately. Go to your Intuit Account > Sign-In & Security. This single step means that even if someone has your password, they still cannot get in without your phone. It takes three minutes to set up and it is the single most effective protection available.

Update your recovery email and phone number. Go into your Intuit account settings and make sure both of these are current addresses and numbers that you actually have access to today. Not an old work email. Not a number you cancelled last year.

Add your accountant as an admin user if they are not already. This gives you a backup recovery path that bypasses Intuit’s entire process if you are ever locked out again.

Save your QuickBooks subscription details somewhere safe. Your order number, billing email, and payment method details are what Intuit uses to verify your identity. Put them in a password manager or a secure document you can find fast in a crisis.

Set up a monthly data export. Fifteen minutes once a month to download your company data externally is cheap insurance against any access issue — recovery delay, account suspension, or anything else.

Conclusion

Getting locked out of QuickBooks Online is genuinely awful — especially when your business is in the middle of something important. But it is not permanent. The right recovery path exists for almost every situation, whether that is a simple password reset, a formal QuickBooks Online account recovery request, recovering through your accountant, or dealing with a compromised account.

Work through the methods in order. Gather your account information before contacting Intuit. And once you are back in, spend fifteen minutes setting up the protections that make sure this never happens again.

If you are stuck right now and cannot afford to wait — call QBookAssistat +1-866-408-0544. Our team will help you get back into your account and make sure everything is exactly as it should be when you do.

Frequently Asked Questions

Q1: How do I start QuickBooks Online account recovery?

Ans. Go to quickbooks.intuit.com, click Sign In, and then click “I forgot my password.” Enter the email address on your account and check your inbox — including spam — for the reset link. If your email is no longer accessible, use the phone number recovery option or contact Intuit directly to submit a formal recovery request.

Q2: What is the QuickBooks Online account recovery form and when do I need it?

Ans. It is Intuit’s formal identity verification process for users who have lost access to both their account email and phone number. You provide billing and business details to confirm who you are, and Intuit restores access after verification. Most standard cases are resolved within 24 to 48 hours, though complex situations can take longer.

Q3: How do I recover my QuickBooks Online password if I have forgotten it?

Ans. Click “I forgot my password” on the QuickBooks sign-in page, enter your email address, and use the reset link Intuit sends you. The link is valid for thirty minutes, so open it promptly. If the email does not arrive within ten minutes, check your spam folder before assuming it was not sent.

Q4: My QuickBooks Online account was hacked — what do I do first?

Ans. Call Intuit support by phone immediately and use the word “compromised” clearly. Ask them to flag your account and prevent further changes while your identity is being verified. Do not use the standard online recovery form for hacked accounts — phone contact gets these cases escalated faster.

Q5: Can my accountant help me recover access to QuickBooks Online?

Ans. Yes — and this is often the fastest route. If your accountant has admin access to your QuickBooks Online company, they can restore your user access directly from inside the account without going through Intuit’s recovery process at all. Call them first before anything else.

Q6: What should I check after recovering my QuickBooks Online account?

Ans. Run a QuickBooks Online account reconciliation immediately. Check your accounts receivable report, verify your bank feed connections are still active, audit your user list for anyone who should not have access, and export a full data backup from Settings before resuming normal work.

Q7: How long does QuickBooks Online account recovery take?

Ans. A password reset with a working email takes five to fifteen minutes. The formal recovery form takes one to two days for standard cases. Hacked account recovery typically takes two to four days. Having your subscription details and billing information ready before contacting Intuit significantly speeds up every type of recovery.

QuickBooks Online Test Drive — Explore a Free Sample Company Without Any Risk

What if you could explore QuickBooks Online fully — without entering your credit card, without risking your real business data, and without being locked into a subscription you are not ready for?

That is exactly what the QuickBooks Online Test Drive gives you. It is a free, no-login, no-commitment sandbox environment loaded with a pre filled sample company. You get to click through every feature, run reports, create invoices, and explore the dashboard — all in a live environment with zero consequences.

At QBookAssist, our QuickBooks support services team guides hundreds of small business owners and accountants through QuickBooks every month. And this test drive is always the first thing we recommend before anyone spends a dollar on a subscription. Here is everything you need to know.

What Is the QuickBooks Online Test Drive?

The QuickBooks Online Test Drive is a free sample company environment provided by Intuit that lets you use a fully functional version of QuickBooks Online — without creating an account, without a credit card, and without touching your actual business data.

Think of it as a flight simulator for pilots. Everything looks and works exactly like the real thing. But nothing you do inside affects any real aircraft.

Inside the QBO test drive you get:

  • A pre-loaded sample company called Craig’s Design and Landscaping Services
quickbooks online sample company craig's landscaping
  • Real transactions, invoices, expenses, payroll entries, and bank feeds already filled in
  • Full access to the QuickBooks Online Plus feature set
  • The ability to create, edit, and delete records freely
  • A completely reset environment — every time you log out and come back, the sample data is restored fresh

This is not a watered-down demo. It is the real QuickBooks Online interface with real data to explore.

Why Most Business Owners Get This Wrong

Here is something nobody tells you upfront.
Intuit’s standard free trial requires you to enter your credit card details. The moment your trial ends — whether you realized it or not — your subscription starts billing automatically. Many small business owners have called us after being charged for a plan they never intended to
activate.
That is the subscription trap of traditional software trials.

The second problem is even more serious. Some business owners skip the trial entirely and start entering real company data into QuickBooks immediately — without fully understanding how the software works. This leads to:

  • Wrongly categorized transactions that corrupt your books
  • Duplicate entries that take hours to clean up
  • Permanent errors in payroll or tax settings that require professional recovery
  • Data that cannot be easily undone once saved

    The QuickBooks Online Test Drive solves both problems completely. No card. No subscription. No real data at risk.

QBookAssist Tip: We always tell our clients — spend at least 2 hours in the test drive before touching your real company file. Those 2 hours can save you from 20 hours of data cleanup later.

How to Access the QuickBooks Online Test Drive

No requirement login, account and credit card. Here is how to get in right now.

Test drive and practice using QuickBooks Online

Step 1: Open the Test Drive Link Directly

The QuickBooks Online Test Drive USA version is accessible at Intuit’s official link. Simply open your browser and search for “QuickBooks Online test drive” — the official Intuit page will appear at the top. Click the link and you are inside instantly.

You do not need to create a QuickBooks account. You do not need to verify your email. The sample company loads directly in your browser.

Pro Tip: Use Google Chrome or Microsoft Edge for the best experience. Some features in the QBO test drive may not render correctly in older browsers like Internet Explorer.

Step 2: Complete the CAPTCHA Verification

The only step between you and the sample company is a simple CAPTCHA check — this confirms you are a real person and not an automated bot. Click the checkbox, complete the verification if prompted, and the QuickBooks Online sample company dashboard opens immediately.

No personal information required. email address and phone number.

Step 3: Start Exploring the Sample Company

You are now inside Craig’s Design and Landscaping Services — a fictional but fully realistic small business. The sample company is pre-loaded with:

  • Customer invoices and payments
  • Vendor bills and expenses
  • Bank and credit card transactions
  • Payroll records
  • Profit and Loss reports
  • Balance Sheet and Cash Flow statements
  • Chart of Accounts
  • Inventory items and estimates

Everything a real small business would have in QuickBooks Online is already here. You can click on anything, edit anything, run any report, and explore any feature — completely freely

What Can You Do Inside the QuickBooks Online Test Drive?

Most people do not realize how much the QBO test drive actually lets you explore. Here is what you can practice:

Create and Send Invoices

Go to Sales > Invoices > New Invoice. You can create a real invoice, add line items, apply taxes, attach files, and preview how it looks to customers. This is the most important workflow for service-based businesses — and the test drive lets you practice it completely.

Run Financial Reports

Go to Reports in the left menu. Every report QuickBooks Online offers is available:

  • Profit and Loss
  • Balance Sheet
  • Cash Flow Statement
  • Accounts Receivable Aging
  • Sales by Customer
  • Expense by Vendor
  • Tax Summary

Run each one, change the date ranges, and see how your real business data would look once you start using QuickBooks.

Explore the Chart of Accounts

Go to Accounting > Chart of Accounts. This is where most new users make permanent mistakes in their real company file — creating duplicate accounts or wrong account types. The test drive lets you practice editing, adding, and organizing accounts without any consequences.

Record Expenses and Bills

Go to Expenses > New Expense. Practice adding vendor bills, receipts, and expense categories. Understanding how expenses flow into your Profit and Loss report is critical before you start with real data.

Pro Tip: Pay close attention to the difference between Expense and Bill in QuickBooks. An expense is paid immediately. A bill is something you owe but haven’t paid yet. Getting this wrong in your real company file causes account balance errors that are hard to fix.

QuickBooks Online Test Drive — USA vs Canada Version

Quickbooks online test drive usa vs canada comparison 2025
FeatureQuickBooks Online Test Drive USAQuickBooks Online Test Drive Canada
CurrencyUSDCAD
Tax SetupUS Sales TaxCanadian GST/HST/PST
PayrollUS payroll structureCanadian payroll structure
Date FormatMM/DD/YYYYDD/MM/YYYY
Sample CompanyCraig’s Design & LandscapingSame company, localized data
Access MethodNo login requiredNo login required

Both versions are completely free and require no account creation. If you are a Canadian business owner or accountant, search specifically for “QuickBooks Online test drive Canada” to get the correct regional version with Canadian tax settings pre-configured.

QuickBooks Online Test Drive vs Free Trial — What Is the Difference?

FeatureQBO Test DriveQBO Free Trial
Login required❌ No✅ Yes
Credit card required❌ No✅ Yes (auto-charges after trial)
Your own data❌ No (sample only)✅ Yes
Risk of being charged❌ Zero✅ Yes if you forget to cancel
Time limit❌ No limit✅ 30 days
Best forLearning the softwareTesting with your real data
Resets after logout✅ Yes❌ No

Our recommendation at QBookAssist:
Start with the test drive to learn the software. Once you are confident, start the free trial — but set a calendar reminder for Day 25 to either subscribe or cancel before you are charged.

Once you are ready to subscribe, compare the official QuickBooks Online pricing plans to find the right tier for your business.

Who Should Use the QuickBooks Online Test Drive?

  • Small business owners who want to see if QuickBooks Online fits their workflow before committing to a monthly plan.
  • Accountants and bookkeepers who are onboarding a new client onto QuickBooks Online and want to map out their workflow before touching the client’s live file.
  • Businesses migrating from QuickBooks Desktop to Online who want to understand how the Online interface works before making the switch — because the two versions look and feel very different.
  • Students and trainees learning QuickBooks for certification or job preparation — the test drive is a completely safe environment to practice.
  • Existing QuickBooks users who want to test a new feature — like a new report type or QuickBooks payroll setup — without experimenting on their live company file.

When You Need More Than a Test Drive

The QuickBooks Online Test Drive is excellent for learning. But there are situations where you need professional support — not a sandbox.

Call a QuickBooks specialist if:

  • You are migrating from QuickBooks Desktop to Online and want to ensure zero data loss during the transition
  • You have already made errors in your live company file and need them corrected before your accountant or tax deadline
  • You want a done correctly from day one — chart of accounts, tax settings, payroll, and bank connections configured properly
  • You are an accountant managing multiple client files and need a system built for your practice

This is where QBookAssist comes in. Our certified QuickBooks specialists handle everything from initial setup to error recovery — so you never have to guess whether something is configured correctly. Call us at +1-866-408-0544 for a free consultation.

Conclusion

The QuickBooks Online Test Drive is one of the most underused tools Intuit offers — and one of the most valuable. It gives you a completely free, no-risk environment to explore the full power of QuickBooks Online before you commit a single dollar or enter a single real transaction.

Use it to learn the software, practice your workflows, and build confidence. Then when you are ready to go live — make sure your setup is done right from the start.

Have questions about QuickBooks Online or need help with your setup? Call QBookAssist at +1-866-408-0544 — our team is available to help you get started the right way.

Frequently Asked Questions

Q1: Is the QuickBooks Online Test Drive really free?

Ans. Yes — completely free. No credit card, no account, no email address required. You access it directly through Intuit’s official website and the sample company loads instantly in your browser. There is no time limit on the test drive either.

Q2: Does the QuickBooks Online Test Drive save my changes?

Ans. No — and that is the point. Every time you log out and return to the test drive, the sample company resets to its original state. This means you can practice, make mistakes, and experiment freely without any permanent consequences.

Q3: What is the difference between the QuickBooks Online Test Drive and the free trial?

Ans. The test drive uses a pre-loaded sample company with no login or credit card required. The free trial lets you use QuickBooks with your own data but requires account creation and credit card details, and auto-charges after 30 days if not cancelled.

Q5: Is there a QuickBooks Online Test Drive for Canada?

Ans. Yes. Intuit offers a Canada-specific version of the test drive with Canadian tax settings (GST/HST/PST), CAD currency, and Canadian payroll structure pre-configured. Search for “QuickBooks Online test drive Canada” to access the correct regional version.

Q6: Can I practice payroll in the QuickBooks Online Test Drive?

Ans. Yes. The sample company includes payroll data you can explore and edit. However, you cannot process actual payroll runs in the test drive. It is best used to understand the payroll interface and setup before working on a live company file.

Q7: What version of QuickBooks Online does the test drive use?

Ans. The QuickBooks Online Test Drive sample company uses the QuickBooks Online Plus feature set — which includes inventory tracking, project profitability, and budgeting tools. Some features exclusive to Advanced or Simple Start may not be fully visible.

Top 8 Methods to Fix QuickBooks Error 15107 Instantly

At times, the QuickBooks Error 151017 comes under the 15xxx series of errors that appear while trying to update QuickBooks Desktop or download the latest tax table. When it appears, the following message flashes on the screen, stating.

“[Error 15107] The update system cannot be initialized”

how to fix QuickBooks Error 15107

This issue mainly indicates a failed digital signature verification, missing components, or firewall restrictions. As a result, users are unable to download or install the latest QuickBooks Desktop or payroll updates. Read this blog to get a better insight into the root causes and effective troubleshooting methods to fix QuickBooks Error Code 15107.

Reasons Why QuickBooks Payroll Update Error 15107 Occurs

There are multiple reasons that may cause QuickBooks Payroll Update Error 15107. Let us explore the actual causes behind the issue.

  1. Running the invalid or outdated Digital Signature Certificate is restricting QuickBooks from verifying update files.
  2. If your QuickBooks Desktop is outdated.
  3. In case the Windows files are damaged.
  4. QuickBooks File Copy Service is disabled temporarily.
  5. The shared download drive is not mapped properly.
  6. Windows Firewall or a security application is blocking payroll updates in QuickBooks.

How to Identify QuickBooks Payroll Error 15107?

The following are the signs and symptoms that will help you identify QuickBooks Payroll Error 15107.

  1. Payroll updates fail to download or install successfully.
  2. An error message related to Error 15107 appears on the screen.
  3. QuickBooks may freeze or stop responding during the update process.
  4. The system repeatedly prompts you to retry the payroll update.

How to Fix QuickBooks Desktop Error 15107 In 8 Easy Steps?

After knowing the reasons, it’s essential to find the appropriate troubleshooting method to fix QuickBooks Desktop Error 15107. Here, we have mentioned the most relevant solutions that will help you fix the issue so that you can run the update.

Method 1: Download the Latest Updates As Administrator

Users may end up with Error code 15107 in QuickBooks due to a lack of administrative rights. So, to fix the issue, you must try to download the QuickBooks updates as an administrator.

Administrator
  1. Close all company files and make sure QuickBooks Desktop is not running.
  2. Locate the QuickBooks icon, then right-click on it.
  3. Select Run as Administrator from the menu.
  4. If prompted with “Do you want to allow this program to make changes to your computer?”, choose Yes.
  5. Once opened, attempt to download the latest QuickBooks Desktop version or update the payroll tax tables.

Method 2: Run Quick Fix My Program

Quick Fix My Program is used to put an end to the background running processes in QuickBooks. So, to run this tool, perform the steps instructed below.

Use the Quick Fix My Program Tool
  • Open the QuickBooks Tool Hub if it’s installed. Otherwise, download and install the latest version of Tool Hub before proceeding.
  • Navigate to the Program Problems section.
  • Select Quick Fix My Program, then restart QuickBooks.
  • Reopen your company file and attempt to install the latest QuickBooks Desktop updates or payroll tax table updates.

If the issue persists, try the following steps:

  • Close QuickBooks Desktop.
  • Navigate to C:\ProgramData\Intuit\QuickBooks XX\Components.
  • Right-click the Components folder and select Delete.
  • Reopen QuickBooks Desktop and go to the Help menu, then choose
  • Update QuickBooks Desktop.
  • Click on Update Now and check the Reset Update box.
  • Select Get Updates. Once the process is complete, close and reopen QuickBooks Desktop.
  • Return to the Help menu and click Update QuickBooks Desktop again.
  • Finally, go to the Overview tab and select Update Now.

Method 3: Install the Latest Digital Signature Certificate

QuickBooks accesses the Digital Signature Certificate to confirm the updates and to ensure its authenticity. If this certificate is missing, outdated or corrupt, QuickBooks fails to validate the update files, which may cause QuickBooks Error Code 15107.

  1. Open the C: drive, then navigate to Program Files > Intuit > QuickBooks.
  2. Search for the QBW32.exe file, right-click it, and select Properties.
  3. Go to the Digital Signatures tab.
  4. Make sure that the Intuit is selected in the signature list.
  5. Click Details, then choose View Certificate in the Digital Signature Details window.
  6. Select Install Certificate and click Next (unless the Finish option appears directly).
  7. Click Finish, then restart your computer.
  8. After rebooting, open QuickBooks and try downloading the update again.

Method 4: Run the QuickBooks Install Diagnostic Tool To Fix Errors

The QuickBooks Install Diagnostic Tool fixes Error Code 15107 by detecting and repairing problems in the Microsoft components that QuickBooks relies on. It scans for installation issues or corruption and ensures all necessary components are properly configured for smooth update installation.

QuickBooks Install Diagnostic Tool - Fix Installation Errors
  1. Open the QuickBooks Tool Hub and go to Installation Issues tab.
  2. Choose the QuickBooks Install Diagnostic Tool option. After this, wait unless the tool runs and fix the issue.
  3. Once it’s done, relaunch your PC and start QuickBooks Desktop, then your company file.
  4. At last, try downloading the latest updates and see if the issue is resolved.

Method 5: Reinstall QuickBooks Desktop

Reinstalling QuickBooks Desktop can fix Error 15107 because it replaces corrupted or missing program files that may be blocking updates. Also, it refreshes installation components and restores default settings. Thus, allow QuickBooks to download and install updates without any hindrance.

  1. Open the Control Panel and click Programs and Features.
  2. Choose the QuickBooks Desktop, right-click on it and hit the Uninstall option.
  3. Now, launch the folder that has your QuickBooks company file. You will get the folder in the following location.
    • C:\ProgramData\Intuit\QuickBooks (year)
    • C:\Users\(current user)\AppData\Local\Intuit\QuickBooks (year)
    • C:\Program Files\Intuit\QuickBooks (year)
    • 64-bit version C:\Program Files (x86)\Intuit\QuickBooks (year)
  4. After this, right-click on the folder and click Rename.
  5. Rename the file by adding Old at the end of the file name.
  6. At last, try to install QuickBooks Desktop again using the on-screen prompt.

Method 6: Run the Reboot.Bat File

Follow these steps to run the reboot.bat file and fix QuickBooks Payroll Update Error 15107.

  1. Close the QuickBooks Desktop application.
  2. Right-click the QuickBooks icon and select Properties.
  3. Click Open File Location.
  4. In the search field, type reboot.bat.
  5. Right-click the reboot.bat file and select Run as Administrator.
  6. When prompted, click Yes to continue.
  7. Restart your computer, and when prompted, choose Update Now to install the update.

Method 7: Configure the Settings of Internet Explorer & Security

Use the following steps to correct the Internet Explorer and security settings.

  1. Launch Internet Explorer and right-click the Settings tab.
  2. Choose the Tools option and hit the Internet Options from the drop-down menu.
  3. Now, tap on Security and click the Website Zone option.
  4. Also, review the system date and time and the cypher strength.
  5. Finally, try updating the settings of Internet Explorer.

Method 8: Enable the QuickBooks File Copy Service

QuickBooks software requires the File Copy Service to run the updates. If it is turned off, then updates may fail.

  1. Initially, hit the Windows + R keys to launch the Run window.
  2. After this, insert “COMPMGMT.MSC” and hit the OK tab. This will launch the Computer Management window.
  3. From the left panel, choose Services and Applications. Then, tap on the Services option.
  4. Next, scroll down to the bottom to locate Intuit QuickBooks FCS and double-tap on it.
  5. Within the new window, set Startup type to Manual. Then, hit the Apply and click OK.
  6. After that, revalidate your payroll service key.
    • Head to the Employees menu in QuickBooks and hit the My Payroll Service.
    • Go to the Activate Service key option and pick your current payroll. Then, hit the Edit > Next option unless you see the Finish option and click Finish.
  7. Finally, run the QuickBooks Desktop or payroll update again.

Conclusion

QuickBooks Error 15107 is a common payroll update issue that occurs due to digital signature problems, outdated components, or system restrictions. However, by understanding the causes and symptoms makes it easier to apply the right troubleshooting methods. By following methods the above methods you can easily address this issue. Thus, it will help you restore the smooth functioning of QuickBooks Desktop without further interruptions.

Frequently Asked Questions (FAQ’s):-

Question 1: Why am I getting QuickBooks Error 15107 while updating payroll?

Ans. QuickBooks Error 15107 mainly occurs when QuickBooks fails to verify or download payroll updates due to system or security-related issues.

Question 2: How to prevent QuickBooks Error Code 15107 in the future?

Ans. Make sure to keep QuickBooks updated, verify stable internet connectivity and allow QuickBooks through the firewall and security settings.

Question 3: Does Error 15107 affect payroll processing?

Ans. The QuickBooks Error 15107 doesn’t directly impact the existing payroll data, but it may prevent downloading important payroll updates.

What Causes QuickBooks Error PS033 & Top Methods to Fix It?

QuickBooks Error PS033 is a payroll update error that occurs when the software fails to read payroll setup files or when the tax table is corrupted. It mainly occurs due to a damaged CPS folder, an incorrect service key, or an outdated QuickBooks Desktop version. When the error triggers, the following alert message flashes on the screen stating;

ps033 error in QuickBooks desktop

“[PS033]: QuickBooks can’t read your payroll setup files. Note the message number at the beginning of this message, and click Help for troubleshooting tips to resolve this problem.”

As a result, this error causes payroll update failure and requires updating tax tables or resetting the CPS folder. In this guide, we have mentioned all the causes and effective solutions to fix QuickBooks Payroll Error PS033.

QuickBooks Error PS033 mainly appears while trying to download the latest payroll updates. So, to fix the issue, rename the CPS folder.  

What is Error Code PS033 in QuickBooks?

The QuickBooks Error Code PS033 usually appears while downloading the latest payroll updates. It may occur due to damaged or corrupt company files on your system.

What Brings Forth QuickBooks Desktop Error PS033?

Users often encounter QuickBooks Desktop Error PS033 due to a damaged CPS folder. Other factors causing this error are mentioned below.

  1. Running the outdated version of the payroll tax table.
  2. Inadequate internet connection settings.
  3. Windows Firewall is blocking the payroll updates in QuickBooks Desktop.
  4. Using an invalid or inactive QuickBooks payroll subscription.
  5. Insufficient admin rights to install new QuickBooks software updates.
  6. Not using the updated QuickBooks Desktop version.

How to Fix QuickBooks Payroll Update Error PS033?

Fixing the QuickBooks Payroll Update Error PS033 may seem complicated, but you can try the following troubleshooting methods to fix it.

Method 1: Check Your Payroll Service Subscription

To prevent the PS033 error in QuickBooks Desktop, check whether you have an active payroll subscription. Use the following steps to check the status of the payroll subscription.

  1. Exit from all your company files and restart your PC.
  2. Launch the QuickBooks application and click the Employees menu.
  3. From the sub-menu list, choose My Payroll Service and hit the Manage Service Key option.
My Payroll Service > Activate Direct Deposit
  1. Be sure that your Service Name is correct and that the status is set as Active.
  2. Now, hit the Edit menu and review the service key number. If it’s incorrect, provide the right service key.
  3. Tap on the Next option and leave the checkbox of the Open Payroll Setup box unchecked. Then, hit the Finish tab.
  4. As a result, it will start downloading the entire payroll update. If the error persists, then try the next solution.

Method 2: Register & Update Your QuickBooks Desktop

Make sure that you have the latest security and software improvements. Perform the following steps to check if your software is registered.

Update the QuickBooks Desktop
  • Initially, hit the F2 key to launch the Product Information window.
  • After this, see next to the license number, and see if it shows Activated.
    • Important Tip: If it won’t say Activated, register your QuickBooks Desktop.
  • Once the registration is done, update QuickBooks to the latest release.
  • Finally, download the latest payroll tax table update.

Method 3: Rename the QuickBooks CPS Folder

Damage to the QuickBooks CPS folder may cause QB Payroll error code PS033. Therefore, to fix the issue, change the name of the QuickBooks CPS folder.

  1. Close QuickBooks and navigate to the following path: “C:\ Program Files\ Intuit\ QuickBooks 20XX\ Components\ Payroll\ CPS.”
  2. After this, right-click on the CPS folder and choose the Rename option.
  3. Include .OLD at the end of the file name and save it.
  4. At last, continue your payroll tasks and see if the QuickBooks Payroll Error PS033 still exists.

Method 4: Disable the User Account Control (UAC)

Turning off the User Account Control settings helps users rectify the QuickBooks Payroll Error Message PS033 by deleting the Windows security restrictions preventing QuickBooks from updating payroll files. User Account Control might block access to QuickBooks, preventing editing or accessing the important files in the CPS folder. Perform the following instructions to turn off the User Account Control settings.

  1. Before starting, exit from the QuickBooks application.
  2. Go to the desktop, right-click on the QuickBooks icon.
  3. Tap on the Run as Administrator option from the options.
  4. This will open a pop-up window asking if you will allow the program to make changes to the computer, and click Yes.
  5. You will see that the program will open normally. UAC controls for this session have been disabled temporarily.
  6. If you exit from the window and launch Internet Explorer again normally, UAC Control will be set as Active by default.

Method 5: Download the Latest Payroll Tax Table Update

If you are getting the QuickBooks application error code PS033 while opening the company file, try updating the latest payroll tax table. For that, use the steps given below.

  1. Initially, move to the Employees menu and click Get Payroll Updates.
  2. Verify that you have circled the Download Entire Update checkbox.
  3. At last, hit the Download Latest Update option.

Method 6: Add Defender Exclusion & Run Quick Fix My Program

Use the Quick Fix My Program Tool
  1. Exit from the QuickBooks Desktop and your company file.
  2. After this, add the Defender Exclusion. Otherwise, you can temporarily turn off the Windows Defender Antivirus Protection.
  3. Choose the Program Problems from the QuickBooks Tool Hub.
  4. Tap on Quick Fix My Program and then relaunch QuickBooks.
  5. Thereon, ensure that you have updated QuickBooks Desktop to the latest release.
  6. At last, download and install the latest tax table.

Method 7: Restore Advanced Connection Settings in Internet Explorer

At times, the connection settings in Internet Explorer may block you while updating the QuickBooks Desktop. As a result, it may result in Payroll update error code PS033 in QuickBooks. Follow the steps below to edit the connection settings in Internet Explorer.

  1. Launch Internet Explorer on your computer and move to Google.com.
  2. Choose the Tools menu and click Internet Options.
  3. After this, hit the Advanced option and head to the Reset or Restore Defaults option.
  4. Finally, click Apply and then the OK tab to complete the process.

Method 8: Update Internet Settings

Use the following steps to configure the internet settings to fix the payroll update error code PS033 in QuickBooks.

  1. Firstly, go to the Tools menu and click Internet Options.
  2. Hit the Delete option from the General tab.
  3. After that, choose the Temporary Internet Files and hit the Delete option.
  4. Browse to the LAN Settings on the Connections tab. Circle the checkbox of Automatically Detect Settings. Make sure to keep all proxy servers blank unless you use one. Then, hit the OK tab twice.
  5. Now, scroll down to the list and click the Advanced tab. Circle the checkbox of SSL 2.0 and SSL 3.0.
  6. Also, verify that the checkbox of “Check for publisher’s certificate” is unmarked.
  7. Once again, scroll down, and ensure that TLS 1.2 is marked. Make sure to keep the checkbox of TLS 1.0 and TLS 1.1 marked.

Method 9: Add Intuit as a Trusted Website in Internet Explorer

To add Intuit as a trusted website in Internet Explorer, perform the following steps.

  1. Initially, hit the Tools menu > Internet Options from Internet Explorer.
  2. After this, head to the Security tab and hit the Trusted Sites icon.
  3. Move to the Sites option.
  4. Insert “*.intuit.com” into the Add this website to the zone box.
  5. Afterward, circle the checkbox of Require server verification (https:) for all sites in this zone to clear it.
  6. When all the changes are done, hit the Close and then OK option.

Method 10: Update Windows Operating System

Perform the following steps to update the Windows operating system to the latest version.

  1. Click the Start menu and type updates in the search console.
  2. After that, hit the Check for Updates option.
  3. Now, download and install the latest Windows updates if available.
  4. Finally, relaunch your PC to apply the changes.

Conclusion

QuickBooks Error PS033 mainly appears when trying to update the QuickBooks payroll to the latest version. But it can be easily fixed by updating Windows, disabling the QuickBooks File Copy Service, editing the Internet settings, or verifying the payroll service subscription. By following the above solutions, you can easily regain access to payroll updates without any further delays.

Frequently Asked Questions (FAQS):-

Question 1: What causes PSXXX error codes when downloading payroll updates in QuickBooks Desktop?

Ans. The QuickBooks Error PSXXX mainly arises while trying to download payroll updates in QuickBooks Desktop. This issue may arise due to incorrect internet settings or firewall blockage.

Question 2: What are the signs indicating QuickBooks Error Code PS033?

Ans. The following are the signs that you may experience while encountering QuickBooks Error Code PS033.

  • You won’t be able to download the payroll update.
  • The error message appears while getting the QuickBooks Error PS033.
  • Your QuickBooks application may freeze, or your system may start crashing.

Question 3: Why am I getting a QuickBooks payroll update error?

Ans. The QuickBooks payroll update error may occur due to an inactive QuickBooks payroll subscription or outdated billing details. This error may prevent you from downloading the latest payroll tax table update.

Question 4: What is the payroll update error in QuickBooks Desktop?

Ans. The QuickBooks Payroll update error occurs when the software fails to download the payroll tax table update.

How to Choose the Right Bookkeeping Services in New York?  

Running a business in New York City requires precision and accuracy in financial management. Finding the best bookkeeping services in New York City is necessary to keep the financial records accurate. Also, it helps to manage cash flow, and make informed business decisions. Whether you are a small business owner or a growing enterprise, partnering with a trustworthy accounting professionals ensures efficiency, compliance, and strategic growth.

In this guide, we cover the top bookkeeping services in New York, how to find bookkeeping services near you, and the advantages of working with certified QuickBooks ProAdvisors in New York who provide customized solutions tailored to your business needs.

Why Bookkeeping Services are Crucial For Business?

Running a business smoothly in New York is not so difficult, but it’s also competitive and fast-paced. Without having proper books of accounts, it’s very easy to lose track of spending, skip important tax deadlines, or make poor financial decisions. Here comes a time when you need a professional bookkeeper who can keep track of all business finances.

Below, we have discussed the key advantages of hiring a bookkeeping service, which is beneficial for your business.

  1. Bookkeeping services provide businesses with clean, accurate financial records to stay at the top of federal and state tax requirements.
  2. You can easily concentrate on the overall growth of your business, where the experts can take care of business finances.
  3. Also, by keeping your books of accounts up-to-date, you can simplify your tax filing experience.
  4. Bookkeeping also keeps track of your income and expenses to prevent surprises.

How to Find the Best Bookkeeping Near Me?

For choosing the right bookkeeping services in New York City, you must consider the following pointers. This will help you choose a suitable accounting service for your business-specific needs.

  • Location-

If you are looking for in-person consultations, then search for the service near your business in Manhattan, Brooklyn, Queens, or the Bronx.

  • Industry Expertise-

Also, look for the accounting firm having the QuickBooks Proadvisor near me in New york that can understand your business type, bookkeeping for e-commerce, production, and manufacturing.  

  • Technology & Software-

To choose the best bookkeeping services in New York, one must search for the firms that use cloud-based software such as QuickBooks, Xero, and FreshBooks. Also, ensure that they use AI-powered computing tools for bookkeeping services in New York.

  • Pricing & Transparency-

You must compare service packages with other bookkeeping services available in the market. Also, ensure that it doesn’t include any hidden charges. Always make sure to search for the flexible pricing plans that fit best according to your budget and needs.

  • Customer Reviews-

You must thoroughly review the client testimonials and ratings to verify the company’s reliability and professionalism.

What are the Top Bookkeeping services in New York?

Here we have listed the top bookkeeping services in New York.

  • Black Ink Tax Accounting –

Blank Ink tax accounting is a one-stop bookkeeping solution designed for small businesses. Moreover, it provides support for QuickBooks and Xero.

  • Pro Bookkeeping Solution-

The Pro Bookkeeping is one of the best bookkeeping services in New York due to its real-time updates using cloud-based technology, along with dedicated account managers.

  • Brooklyn EA-

The Brooklyn EA is also one of the top bookkeeping service providers that focus on startup companies, e-commerce, and creative brands. This is a perfect fit for both small and medium-sized companies in New York.

  • Qbookassist-

Qbookassist is the leading bookkeeping service with certified accountants in New York City. It provides the best accounting and bookkeeping services for small to medium-sized businesses. Qbookassist also provides access to the QuickBooks Proadvisor in New york that can help you manage your financial operations smoothly.

  • NYC Ledger Masters-

NYC Ledger Masters is a perfect bookkeeping service suitable for medium-sized business firms that require multi-currency support.

  • 1800 Accountant-

1800 Accountant is a full-service model that comes along with a dedicated accountant and an income tax preparer. No matter its price range is higher than that of the other companies, it makes it a suitable fit for large firms.

  • Stilz Bookkeeping-

Stilz Bookkeeping is considered the top bookkeeping service with a track record of providing 100% error-free reports. Moreover, it is best for businesses that require cleanup services and long-term support.

  • Botkeeper-

It is the best bookkeeping service that takes care of several clients, because they use AI-driven automation to support large-scale businesses. Also, it helps the accounting firms to handle several clients.

What are the Advantages of Outsourcing Bookkeeping Services in New York City?

The following are the key benefits of outsourcing bookkeeping services in New York City.

  • Cost Savings & Efficiency-

By outsourcing the bookkeeping services, you don’t have to spend much on paying in-house salaries, benefits, and training. The businesses only have to pay for the services used, and it will eventually reduce the overhead cost.

  • High-Technology & Security-

You can get access to the top-tier accounting software and use the advanced security protocols to safeguard the crucial business data from any loss.

  • Improve Decision-Making-

By outsourcing bookkeeping services, businesses can get real-time financial reports, which help them make informed decisions. As a result, it helps in concentrating on business growth.

  • Well-experienced in NYC Tax & Compliance-

You can also get access to the specialized knowledge about New York state and local tax codes. As a result, it helps in minimizing the risk of penalties.

  • Time Savings-

Outsourcing bookkeeping will also free up some space for business owners to concentrate on revenue-generating activities instead of administrative tasks.

Conclusion

Choosing the right bookkeeping services in New York City is important for keeping the financial records accurate. Whether you are looking for the top bookkeeping services in New York or established accounting firms in New York, picking the right partner will improve your decision-making.

If you are looking for any additional help, then consult with the Qbookassist experts.

Frequently Asked Questions (FAQ’s):-

Question 1: What are the four types of bookkeeping?

Ans. The four types of bookkeeping include single-entry bookkeeping, double-entry bookkeeping, computerized bookkeeping, and virtual bookkeeping.

Question 2: How do bookkeeping services help with tax preparation in New York?

Ans. Bookkeeping services help in tax preparation by assuring that your financial records are updated and accurate. As a result, it makes it simple to compute the tax liability, determine deductible expenses, and file tax returns on time.

Question 3: How often should bookkeeping be done in New York?

Ans. It’s recommended that the bookkeeping be done regularly. Make sure that the transactions are recorded monthly or weekly and that financial statements are maintained monthly, quarterly, and annually.

Question 4: How do I know if I need a bookkeeper in NYC?

Ans. If you are spending too much on the administrative tasks, facing issues while organizing the records, or having issues understanding your business’s financial health, then you need to address these issues. A bookkeeper is a person who frees up some time to take care of all your financial records and helps in making the right business decisions.

Question 5: What should I look for when choosing a bookkeeping service in New York?

Ans. While looking for a bookkeeping service in New York, it’s essential to look for a service that understands your industry. Also, it must deliver the best technology and integrations to prioritize clear communication. Look for the customer reviews and ask them about their experience with businesses similar to yours.

How to Fix QuickBooks Error 15241 While Updating Payroll?

Payroll deadlines are important, and nothing disrupts a business more than a faulty update. QuickBooks Error 15241 often appears while trying to update payroll tax tables, preventing the software from updating. However, when the error comes up, it throws the following error message:

“[Error 15241] The payroll update did not complete successfully.
The QuickBooks FSC Service is disabled.”

This error mainly arises due to issues with the Windows Registry or disabled file copy services. If you are also stuck with this error, you’re not alone. In this detailed post, we are going to explain the root causes and troubleshooting tips to fix the QuickBooks Desktop Error 15241.

QuickBooks Error 15241 belongs to the 15xxx series of errors that occur while downloading the latest payroll tax table update. So, to resolve the issue, enable the QuickBooks FCS Service and update the payroll tax table.

What is Error 15241 in QuickBooks Update?

QuickBooks Error 15241 is a payroll update issue that usually occurs when the QuickBooks File Copy Service (FCS) is disabled. It prevents users from downloading or installing payroll updates. This error may also arise due to damaged installation files, issues with the Windows Installer, or security software blocking the update process.

What are the Factors Causing QuickBooks Update Error 15241?

QuickBooks Update Error 15241 is a complex issue that takes place while downloading the payroll tax table update. It may be caused by numerous reasons. Let’s understand all the causes to fix the error smoothly.

  • Inadequate user permissions can restrict the ability to update the QuickBooks Payroll.
  • Incorrect or faulty installation of the QuickBooks Desktop.
  • Using the unsupported version of the QuickBooks software.
  • Antivirus or Windows firewall is blocking QuickBooks from downloading the latest payroll updates.
  • You have disabled the QuickBooks File Copy Service.
  • The shared download drive isn’t mapped correctly.
  • Invalid or outdated Digital Signature Certificate.
  • Misconfigured Internet Explorer settings can also trigger QuickBooks Error Code 15241.

How to Fix QuickBooks Error Code 1524 Using Top 6 Methods?

After understanding the causes, let’s find out the effective ways to resolve the QuickBooks Error Code 15241 smoothly.

Method 1: Run the Reboot.bat file

Running the reboot.bat file will re-register the QuickBooks-related extensions in Microsoft Windows and help fix the Update Error 15241 in QuickBooks.

  • Exit from the QuickBooks application.
  • Move to the QuickBooks folder containing the reboot.bat file.
    • Right-click on the QuickBooks desktop icon from the desktop and click Properties.
    • Choose the Open File location option.
  • Now, right-click on the reboot.bat file and tap on the Run as Administrator option.
Now, right-click on the reboot.bat file
  • As a result, it will launch a Command window with scrolling file names. Make sure not to shut down this window manually. Once the reboot.bat utility is completed, the window will eventually close.
  • At last, relaunch your PC and then launch QuickBooks.

Method 2: Enable the QuickBooks Desktop File Copy Service (FCS)

Here’s how to enable the QuickBooks File Copy Service.

  • Open the Run window and insert COMPMGMT.MSC in the search box.
  • Tap on OK, and it will open the Computer Management window. From there, click the Services and Applications.
  • Tick mark the Services and scroll down to get the Intuit File Copy Service. Then, double-tap on the FCS service.
QuickBooks Desktop File Copy Service (FCS)
  • Choose the Startup Type option and click the Manual option.
  • Now, head to the Apply and then the OK option.

Method 3: Re-Validate the Payroll Service Key

Perform the following steps to re-validate the payroll service key.

  • Initially, move to the Employees menu from the top menu bar.
  • Select the My Payroll Service and hit the Activate Service Key option.
Select the My Payroll Service
  • After that, highlight the current payroll below the Service Keys and choose the Edit menu.
  • Choose the Next option until you finish up.
  • If the issue still exists, then try another solution to fix the error.

Read More:- QuickBooks Won’t Open

Method 4: Install a Digital Signature Certificate

The Digital Signature Certificate verifies the authenticity of QuickBooks updates to download them uninterruptedly. So, to fix the issue, you must install an updated digital signature certificate by performing these steps.

  • Move to the C:\Program Files\ Intuit\QuickBooks file path.
  • After this, locate and right-click the QBW32.exe file and choose the Properties tab.
  • Go to the Digital Signatures tab and verify if Intuit is chosen from the signature list, and hit the Details tab.
  • When you are on the Digital Signature Details window, select the View Certificate option.
  • Choose the Install Certificate option from the Certificate window.
  • Hit the Next tab unless the Finish option is displayed, and then choose Finish.
  • At last, relaunch your system and then try to download the QuickBooks updates.

Method 5: Download the Updates As Administrator

It is essential to have the proper administrative rights to download and install the latest QuickBooks payroll updates. Here’s how to download the updates as an administrator.

  • Exit from the company file and then your QuickBooks Desktop.
  • After this, right-click on the QuickBooks Desktop icon.
  • Select the Run as Administrator option.
  • From the pop-up message, “Do you want to allow this program to make changes to your computer?”, tap on the Yes option.
  • Start downloading the latest QuickBooks Desktop product updates.
  • Finally, begin downloading the latest payroll tax table update once again.

Method 6: Run Quick Fix My Program

To end all the background running processes in QuickBooks, run the QuickBooks Fix My program from the tool hub. This will immediately run a quick repair on your QuickBooks program and help fix the QuickBooks Payroll Update Error 15241.

Use the Quick Fix My Program Tool

Important Tip: Verify you have downloaded and installed the latest version of the QuickBooks Tool Hub.

  • Double-click on the QuickBooks Tool Hub icon to open it.
  • From the dashboard, choose the Program Problems tab.
  • Click the Quick Fix My Program tab.

Method 7: Map the Network Drive on Windows

Perform the steps below to run a mapped drive on Windows.

  1. Launch the Run window by pressing the Windows + R keys.
  2. Now, insert “File Explorer” in the search panel and launch the File Explorer window.
  3. Go to the left pane and pick the “This PC” option.
  4. Hit the More (…) option and then tap on Map Network Drive.
  5. Browse to the Drive section drop-down menu and choose any available letter.
  6. Move to the Folder section, and note down the folder path or computer. Then, hit the Browse tab and pick the network folder.
  7. To ensure that you connect with the network drive every time you log in, hit the Reconnect Sign-in option.
  8. At last, tap on the Finish tab to wrap up the process.

Method 8: Update Payroll Tax Tables

Running the outdated version of the payroll tax table may give rise to the QuickBooks error 15241 payroll update. Perform the following steps to update the payroll tax table to the latest version.

  1. Initially, browse to the QuickBooks Employees menu and click the Get Payroll update option.
  2. Circle the Download Entire Update checkbox and browse to the Update option.
  3. At last, you will get the Download Complete pop-up window on your screen.

Method 9: Repair QuickBooks With QuickBooks Install Diagnostic Tool

The QuickBooks Install Diagnostic tool is used when there is a problem with the installation of the QuickBooks Desktop application. This tool scans for the issues and then runs a quick repair to configure the damage with the QuickBooks installation. Thus, it will help you fix the QB Desktop Error 15241.

Method 10: Reinstall QuickBooks Desktop

Even after applying all the solutions, you still couldn’t fix QuickBooks Error 15241, so try to reinstall QuickBooks Desktop. This will install a fresh version of the QuickBooks software so that you can get the payroll updates smoothly.

Conclusion

QuickBooks Error 15241 is a common payroll update issue that may be caused by incorrect firewall settings, an outdated digital signature certificate or an unstable internet connection. However, you can fix this issue by performing the troubleshooting methods discussed ahead in this blog.

If the error continues, don’t take any stress and reach out to our qbookassist professionals for immediate guidance.

Frequently Asked Questions (FAQ’s):-

Question 1: Why is QuickBooks not updating payroll?

Ans. QuickBooks is not updating payroll due to damaged files, invalid configurations, outdated settings or connectivity issues.

Question 2: What is the File Copy Service in QuickBooks?

Ans. The QuickBooks File Copy Service (FCS) is a background service used by QuickBooks Desktop to apply updates and install payroll components. In case the File Copy Service is disabled, you won’t be able to download the updates.

Question 3: How can I prevent QuickBooks Error 15241 in the future?

Ans. To avoid the QuickBooks Error 15241 from occurring;

  • Make sure that QuickBooks is updated to the latest version.
  • Always ensure that FCS Service is enabled.
  • Verify you have proper admin rights to update the QuickBooks Desktop.

Question 4: Is Error 15241 related to payroll updates?

Ans. Yes, the QuickBooks Error 15241 is often linked with payroll update failures in QuickBooks Desktop.